Showing posts with label Beginning Canner. Show all posts

Thursday, October 3, 2013

County Fair 2013

It's been over two months since our county fair and with all that has been going on I forgot to post how my canned good did at the fair. At last minute I decided to gather some goodies up and send with my husband and daughter to enter them.

County Fair 2013

First time entering anything into a fair. So I was rather nervous sending items as I wasn't sure what they would be looking for. This is what I sent in and where I placed.

Ham and Bean Soup - Third place
Chili - Second place
Raw Pack Chicken Thighs - Second place
Plum Jam - Second place
Salsa - Second place
Corn - First place
Dandelion Jelly - First place
Cherry Pie Filling - First place
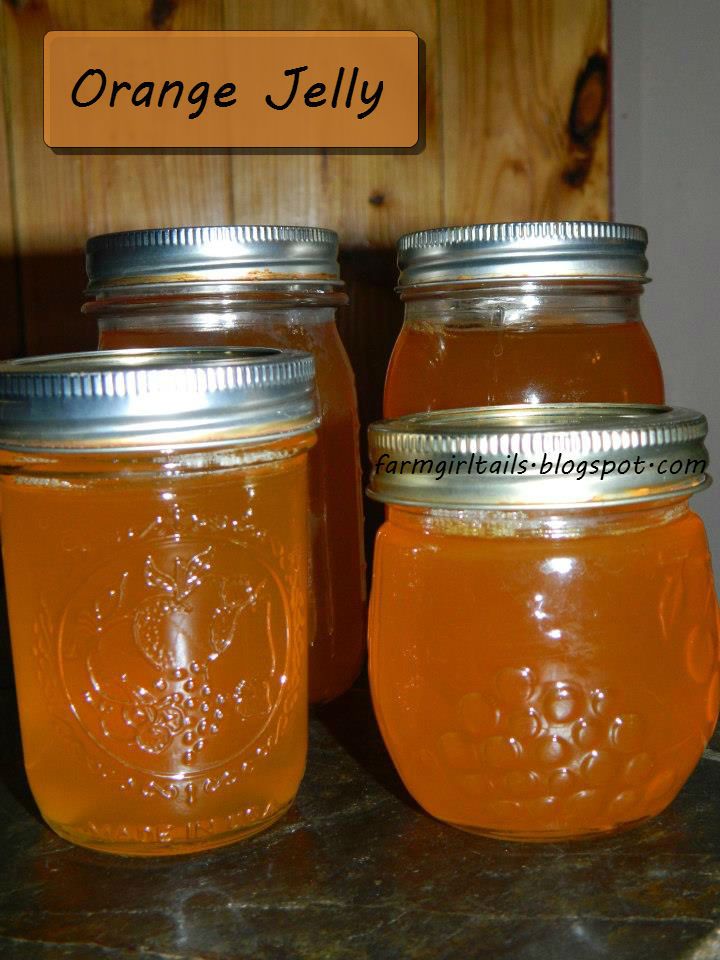
Orange Jelly - First place 
Blue-Barb Jam - First place

Not to shabby for the first time. I actually was totally shocked. There was so many great things submitted. I plan on taking items to the fair again next year I will take different items. If you submitted any canned foods in the fair how did you do?

Keep on canning
~ FarmGirl

Pin It

Chili Hot Beans

I've been wanting to can some Chili Hot Beans for a while now since we eat a lot of chili during the winter. I have finally found the time and a decent recipe that works for me. I wanted to use something along the lines of "Ben's Beans" which is using dried beans without soaking them as I don't have a lot of time on my hands these days. So here's what I have came up with and it works out really great.

Chili Hot Beans

Ingredients per pint jar:
1/4 cup tomato sauce
1 teaspoon onion, diced
1 teaspoon chili powder
1 teaspoon jalpenos, diced
1/2 teaspoon salt
1/2 teaspoon cumin
1/4 teaspoon black pepper
1/4 teaspoon garlic powder
pinch of crushed red peppers
dash of hot pepper sauce (Louisiana)
1/2 cup small red beans (Pinto Beans), rinsed

In prepared sterilized jars add tomato sauce, vegetables and spices, add rinsed beans. Then add boiling water leaving 1 inch head space.


 I give my jars a nice stir to keep the seasonings from clumping up. Clean rims of jars with wet paper towel: affix two piece caps. Process in pressure caner 10 lbs. for (pints) 75 minutes.

If you want to do quarts you will need to double the recipe and process at 10 lbs. pressure for 90 minutes.

Happy Canning

~ FarmgirlPin It

Tuesday, July 23, 2013

Banana Pepper Rings

Makes 2 pints
20-30 banana peppers, depends on size
1 quart white vinegar
2 teaspoons sugar
2 teaspoons canning salt (or pickling salt)
1 pinch alum
1 pinch of turmeric (optional)

Wash and slice peppers - you may want to seed them. (using gloves is highly recommended)
Pack in hot sterilized jars.
Bring vinegar, sugar, salt, alum and turmeric to a boil.
Pour boiling vinegar mixture over peppers in jars leaving 1/2 inch head space.
Wipe rims of jars, affix two piece caps, process in a boiling water bath for 10 minutes and wait for them to seal.

Pin It

Thursday, July 4, 2013

Bluebarb Jam

1/2 cup water
5 cups rhubarb, chopped
2 cups blueberries
5 cups sugar
2 (3 oz.) boxes raspberry Jell-o

Cook rhubarb with water on low heat until tender.

Add sugar stir and cook for a few minutes until sugar is dissolved. Add blueberries and boil for 10 minutes. Add Jell-o and stir until dissolved.

Ladle in jars, wipe rim and cap.

Process in water bath canner for 10 minutes.

~ Farmgirl


Pin It

Sunday, June 23, 2013

Brown Sugar Carrots


Break away from the normal plain carrots. Super easy to prepare and can. Great for beginners to get started in using their canners. I originally came across this recipe on a Canning group on facebook. I'm so glad that I did. My family prefers these over plain ones.

Makes 8 pints

5 pounds carrots, cleaned and sliced
8 tablespoons brown sugar
8 pinches of canning salt
water

Fill each sterilized jar with carrots to 1 inch headspace.

Add a pinch of canning salt and  1 tablespoon brown sugar per jar. Fill with water to 1 inch headspace.
Wipe rims of jars, affix two piece lids and pressure can 30 minutes @ 10 lbs pressure.

~ Farmgirl


Pin It

Saturday, June 22, 2013

Hot Pepper Butter


Makes 8 pints or 16 half pints

4 cups banana peppers, finely ground (36 large banana peppers or 40 medium banana peppers or 50 small banana peppers) can use any combination of peppers that you like
1 quart prepared yellow mustard
1 quart cider vinegar
3 -1/2 cups sugar
1 -1/4 cups flour (or 1 cup clear gel)
1 -1/2 cups water
1 teaspoon salt

Seed and chop peppers finely. (use gloves and food processor to chop the peppers tiny). Mix together sugar, salt, vinegar and peppers in stock pot. Boil 5 minutes.

Mix together flour  clear jel and 1 cup water; to make slurry. Add yellow mustard, remaining 1/2 cup water and slurry to boiling peppers.

Cook until thickened, about 5 minutes.

Ladle into hot sterilized jars, cap with two-piece lids and process in a hot water bath canner for 15 minutes.

** Note Canning with flour is highly forbidden. I am conveying the recipe as it was orginally written. 

I had a request for this a family member and didn't have any on the shelf. Seems like this happens a lot around here now that the kids enjoy hot foods. Good thing I noticed a few peppers ready in the garden to add with the ones I got at the store the other day.  For the photo above I used 3/4 cup jalapenos and 3 1/4 cups of hungarian wax peppers.I think I need to make either some soft pretzels or summer sausage so we can enjoy a fresh jar been a while since we have had some around the house.

Be sure to use latex gloves when working with the peppers. 

Happy Canning

~ Farmgirl


Pin It

Wednesday, June 12, 2013

Tangy Spaghetti Sauce

This is a very mild spaghetti sauce. Thick and chunky just like we like it. I make this with the vegetables we grow from our garden. I have tried many different sauces and this is the first one that has wowed my DH. 
Makes 6 to 7 quarts
3 medium onions, chopped
3/4 cup banana peppers, chopped (Hungarian wax chili peppers)
3 tsp. garlic, minced
16 cups tomatoes, peeled, cored and chopped
2 cups green and red bell peppers, chopped
3 (12 oz) cans tomato paste
3 tablespoons brown sugar
1 tablespoon dried oregano
1 tsp. crushed red pepper flakes
2 tablespoons Italian seasoning
1/2 tsp. ground cumin
1 cup sliced portabella or button mushrooms
4 tsp. canning salt
2 tsp. dried basil
1 tsp. ground black pepper
lemon juice (per jar)

 Add all of ingredients to stock pot.

Heat to boiling. Reduce heat. Simmer, partially covered, for 2 hours. Stirring occasionally.

After it has simmered, add 1 tablespoon lemon juice per pint jar and 2 tablespoons lemon juice per quart, ladle sauce into hot sterilized jars, leaving 1/2 inch head space cap with two piece lids. Process pints 35 minutes and quarts for 40 minutes in a boiling water bath canner.

If you choose you can cool then ladle into freezer containers and freeze.

I also have this recipe posted on my food.com account. If you care to read the reviews you can see them here.

~ Farmgirl


Pin It

Tuesday, June 4, 2013

Crockpot Apple Butter

One of the many comfort foods we enjoy. I love it slathered on homemade biscuits.

5 1/2 pounds apples, peeled and finely chopped (I use three different kinds of apples)
4 cups sugar
2-3 teaspoons ground cinnamon
1/4 teaspoon ground cloves
1/4 teaspoon salt

Place apples in a large bowl. Combine sugar, cinnamon, cloves and salt. Pour over apples and mix well.

Place in crockpot, cover and cook on high for 1 hour.

Decrease heat to low; cover and cook on low for 9 to 11 hours or until thickened and dark brown. Stir occasionally.

Uncover and cook on low for 1 more hour.

If desired, whisk until smooth.

Spoon into freezer containers, leaving 1/2 inch headspace. Cover and freeze.

Or ladle in hot sterilized jars, add 1 tablespoon lemon juice per pint, wipe rim, cap with two-piece lids and process in a water bath canner for 10 minutes.

Makes approx 9 1/2 pints


Pin It

Saturday, June 1, 2013

Corn Cob Jelly

I was very intrigued when I first saw this recipe. I had to make it just to find out what all the hype was about. I'm so very glad I did. I've been making it for many years now and I really enjoy the delicate apple honey taste.

12 sweet corn cobs, corn removed
4 cups water
4 cups sugar
1 (1 3/4 ounce) box fruit pectin

Bring water with cobs to a boil and boil for 10 minutes.
Measure 3 cups and strain through wet cheesecloth.
Pour into a large saucepan with pectin and bring to a rolling boil.
Add sugar.
Bring back to a boil and boil for 3 minutes.
Skim foam if necessary and add food coloring if you want.
Ladle hot jelly into hot jars, leaving 1/4 inch headspace. Adjust two-piece caps.
Process 10 minutes in a boiling-water canner.

Make 6 1/2 pints

Enjoy
~ Farmgirl


Pin It

Friday, May 31, 2013

Shaker Pickles

One of the best sweet pickles I have ever made. Super easy and delicious. I use them on sandwiches, burgers or just a nice side condiment. They have a nice crunch when you bite into them too.
10 medium cucumbers, sliced  (maybe more depending on the size of cucumbers)
4-8 onions, sliced

Fill gallon jar with sliced cucumber and onions (depending on taste).

Mix together:
3 1/2 cups sugar
3 cups distilled white vinegar
1/3 cup pickling salt
1 teaspoon alum
1 teaspoon celery seed
1 teaspoon mustard seed
1 teaspoon turmeric

Pour mixture over cucumbers and onions, cap the jar,  give it a shake, and place jar in refrigerator. Shake once a day for six days. Then pickles are ready for use. Store pickles in refrigerator, where they will keep for several months.

Although, this is not a canning recipe I am including it here because during the canning season I put up 6 or so jars for all year eating. Just make them at different stages of the canning season and you should be good to go all winter long. I label them clearly so I know how long they have been in the fridge. That is if I can keep them that long. I've been known to run out. Thanks to friends and family that snatch a jar or two during a visit.

~ Farmgirl


Pin It

Thursday, May 30, 2013

Mama's Wonderful Salsa

This truly is a wonderful salsa. My family can't get enough of it. 
makes 6 pints
8 cups tomatoes, peeled, chopped and drained
2 1/2 cups onions, chopped
1 1/2 cups green peppers, chopped
1 cup hot banana peppers, chopped
6 cloves garlic, minced
2 teaspoons cumin
2 teaspoons ground black pepper
1/8 cup canning salt
1/3 cup distilled vinegar
1 (15 ounce) can tomato sauce
1 (12 ounce) can tomato paste
1 tablespoon cilantro
1/2 cup cider vinegar
1/3 cup sugar

Combine all ingredients in a large sauce pot. Bring mixture to a boil 10 minutes. Reduce heat and simmer 10 minutes. * For a thicker salsa: cook down till desired thickness. For me its about an hour.

Ladle hot salsa into hot jars, leaving 1/2 inch head space. Adjust two-piece caps. Process 15 minutes in a boiling water bath canner.

* Note: When cutting or seeding, hot peppers, wear rubber gloves to prevent hands from being burned.

~ Farmgirl


Pin It

Wednesday, May 29, 2013

How to Use a Pressure Canner

So I know how overwhelmed new canners feel when they get their new canner and manual out of the box. Than manual in it's self is enough to give a person a good case of anxiety. When I got my new All American I felt the same way. I sat down and read my manual from cover to cover and back and forth. Some of it was Greek to me, but I figured it out.

So, I have seen a few articles about using your pressure canner and they have been very informative. Well I just got the current issue of Mother Earth News in the mail and low and behold a great quick article on how to use your pressure canner was included. I have to say its one of the best ones I have seen in a long while. So I'm going to share it here with you.

This article assumes you have went through your equipment thoroughly to make sure its in good working condition.

Lets get started:

What You'll Need
Pressure canner
Canning jars with rings and new lids
Canning funnel
Jar-lifting tongs
Pots, bowls, measuring cups and spoons
Plastic knife or wooden chopstick for removing air bubbles (metal knives can scratch glass jars)

Assemble Equipment and Ingredients. Though many sources will tell you to sterilize everything, this step is unnecessary. Pressure canning will kill all potential pathogens. Just start with clean equipment and a clean work surface. Discard any jars with nicks in the glass.

Prepare Recipe. Some recipes require you to pack raw food into the jars and then pour hot liquid over the food. With others, you'll cook the food and then pack it hot.

Fill Jars. Be sure to leave the proper amount of headspace (the amount of space between  the top of the food or liquid and the jar's lid.) Recipes should indicate how much headspace is necessary. (The space is needed for the expansion of the food in the jar.)

Seal Jars. Remove air bubbles by stirring with a plastic knife or chopstick. Wipe the jar's rim clean (a bit of vinegar on a cloth can cut through grease), set the lid on the rim, and twist on the ring just until it resists. Don't over-tighten. (Over tightening causes the lids to buckle.)

Prepare the Canner. Place jars on a rack in the canner and add 2 to 3 inches of water, unless otherwise specified. Secure the canner lid into its locked position. If using a weighted gauge, remove the weight. If using a dial gauge, open the petcock. Heat the canner over high heat until steam escapes. Allow steam to vent for 10 minutes. Attach weight or close the petcock. Bring the canner to your recipe's recommended pressure using the high heat setting.

* Set a Timer: Begin timing when the weighted gauge is jiggling steadily (about 2 to 3 times per minute) or when the dial gauge displays the recipe's recommended pressure. Be vigilant, and adjust the heat often to maintain the lowest heat under the canner that will keep the appropriate pressure. Remove the canner from the heat after the required time has elapsed. Jiggler Video Here

Let the Canner cool. Leave the canner alone until the pressure has released naturally, about 30 minutes for quarts. Some models have a feature that will alert you when the pressure is normal. (Depending on the heat in your home this could take longer)

Remove the Weight or Open the Petcock. Let the canner sit undisturbed for a few minutes, then remove the lid. Lean back to avoid a steam burn. Let the open canner stand for 10 minutes.

Let the Jars Cool. Place a towel on the counter. Using a jar lifter, remove the jars to the towel, keeping them an inch apart to allow for air circulation. Let the jars cool for 12 to 24 hours, and then check the seals. The lids should not have any give when you press firmly on the center. If any jars didn't seal, process them a second time.

Fill Your Pantry. Be sure to label jars with the date and contents. Remove the metal rings, as they can corrode during storage. Rings can be reused, but lids should not be.

Eat Up! For best quality, consume within 12 months, but can be consumed many more months past this. (I've eaten food that has been 3 years old).

This article came from Mother Earth News.

~ Farmgirl


Pin It

Thursday, May 2, 2013

Homemade Orange Jelly

This recipe is one I found on another blog and I was thrilled to have found it. During the summer months when I'm grilling out, I use a lot of orange marmalade when making my rib sauce. I've never been a huge fan of the marmalade but loved the flavor. Now, with this orange jelly I can use it as a substitute. Which makes me one happy girl. It works out great also.

I've mainly made freezer jams since I started canning on my own. It's only been about 4 years that I've been experimenting with making different jams and jellies for the shelf. This is one that I'm happy to make every fall when the FFA citrus fruits come in. I hope that you enjoy this jelly just as much as I do.


3 1/2 cups  freshly squeezed orange juice (approx. 8-10 medium to large ripe oranges)
1  box (1 3/4 oz)  pectin
5 cup sugar

Juice oranges the old fashioned way with a juicer and some elbow grease. Strain the juice with a cheesecloth, paper towel or coffee filters. This step makes your jelly clearer and prettier. In my opinion.

Pour the juice into a large pot, add the pectin packet and 1/4 cup of your 5 cups of sugar. Bring to a rolling boil, then add the remaining sugar. Return to a rolling boil, stirring constantly for 1 minute. Skim off any foam. (**Note- As one of my friends pointed out to me because i forgot naturally, you can add 1/4 to 1/2 tsp butter then bring the mixture to a boil, this will reduce and sometime eliminate the foaming.)

Ladle jelly into sterilized jars. Clean rim and place sterilized lids on jars, tighten the rings over the flat lids. Process in a boiling hot water bath for 5 minutes. Remove from BWB and let sit on towel for 24 hours for the jelly to set up.

Happy Canning

~ Farm Girl

Pin It

Wednesday, April 24, 2013

Thrifty Shopping

Yesterday while out and about I took a detour and stopped at one of the local Thrift shops. I normally don't go to this one alone as its not in such a good area. Just freaks me out a bit. I stopped and I am so glad that I did.

My total stop cost me $10.58. I got 31 jars and 1 unopened box of lids and rings. I will be sure to stop in more often if they are going to sell the jars for so cheap. Even if I just pick up one or two they will add up for sure.


This was one of my best scores in a long time when it comes to jars. Tonight I'm sure all the jelly size jars will be filled up. As I have a few orders for jelly that I need to fill. 

Happy thrift shopping and canning everyone!!

~ Farm Girl


Pin It

Thursday, April 18, 2013

The Wide World of Canning

I belong to several canning groups on Facebook and other places. Lately, I have seen items being canned that just blow my mind. Like meatloaf, meatballs, sweet and sour chicken, ham and so on. Now I'm all for convenience and quick meals. I'm finding myself drawn to these things as easy meals for not only my family but things for my husband to take to work in his lunch pail that will take very little effort.

Thankfully, the art canning allows us the opportunity to know exactly what is in our foods. Unlike the quick meals in the stores. I know they are labeled at the stores but really what is some of that stuff we can't pronounce?

So anyhow, I grew up knowing the canning world as my mother and grandmothers have always done it for as long as I can remember. Now that I have been canning for 7 years on my own, many of the things I can is much different from the stuff that they canned. I remember many, many days cleaning potatoes, tomatoes and green beans for the both of them.

I'm so thankful for the Internet and the canning groups that have opened my eyes to the many different recipes and wealth of knowledge that has been provided for me to make such wonderful things. Just so you know I have yet to try the meatloaf, meatballs, and sweet and sour chicken and many other things. But, I'm slowly getting up the nerve to try them.

I now have over 2000 jars so I'm ready to spread my wings and try something new.

What are some of the things you have tried lately that you have thought long and hard about if it was worth the risk?

~ Farm Girl


Pin It

Monday, October 29, 2012

Canning: Beef Vegetable Soup

I finally got time and the energy to do some more canning. I have been meaning to and promised that I would get my recipe for beef vegetable soup up on the blog. Today I cleaned out my refrigerator freezer and gathered some frozen vegetables to make some soup.

When making most soups for canning the preparation is super simple. For this recipe I grabbed 2 quarts of tomato juice from my pantry along with tid-bits from the freezer. You could easily use items from your pantry. I however like the method of cleaning my freezer out to make soups.


Ingredients:
2 quarts tomato juice
8 cups chopped tomatoes
4 cups water
1 carton beef broth
1 1/2 lbs ground beef, browned, drained
3 small onions, chopped
3 stalks celery, chopped
2 cups frozen peas, thawed
4 carrots, chopped
2 cups frozen corn
2 cups frozen lima beans
2 cups frozen green beans
1 cup dried kidney beans, rinsed
2 teaspoons italian seasoning
1 teaspoon onion powder
3/4 teaspoon garlic powder
2 bay leaves
salt and pepper to taste

Combine all ingredients in large stock pot. Bring to a boil and boil 15 minutes, stirring ocassionaly. Reduce heat and let simmer for 30 minutes.

While the soup is simmering this is when I prepare my jars. Wash and sterilize them. Prep lids and rings. Also fill canner to the fill line and bring the water up to simmer. Until ready to add filled jars.

Using a slotted spoon fill jars half  full with beef and vegetables. Fill remaining space with soup juice leaving 1 inch head space. Remove air bubbles. Wipe rim of jar with damp paper towel to remove any debris. Affix lids and rings, finger tight and put filled jars in canner.

Process in a pressure canner. Process pints 75 minutes @ 10 pounds pressure or quarts  90 minutes @ 10 pounds pressure. When complete turn off heat and remove canner from hot burner. Let pressure return to zero naturally. Wait 5 minutes longer and open vent. When cool enough remove lid. Wait 10 minutes then remove jars and place on dish towel in a place that they will sit on overnight to cool.

This recipe yeilded me 8 pints and 4 quarts soup and 1 quart of extra juice. Which I will probably use the extra quart the next time I make vegetable soup.

Now my husband has individual servings of soup for lunch.

~ Farm girl


Pin It

Friday, October 5, 2012

Canning: Chuckwagon Chili

I don't know if many of you know but I've been canning for years and years with mom and granny. But, it wasn't till 7 years ago that I started canning on my own with a long break in between canning with family as I had moved away from home and started a life of my own. It wasn't till I moved back closer to my roots that I began raising a garden and gaining the much needed equipment needed to can. So anyhow, for the past six years its been strictly the basics vegetables, juices and some sauces like spaghetti and salsa.

This year I did my research, I have consulted youtube videos, my BBB (Ball Blue Book) and friends I have made on several FB groups. That I finally decided its time for meals in a jar such as chili. This will certainly give me a leg up on my DH's lunches, snow days with the kids and a quick meal if we need it on those busy nights.

Here we go!

Chuckwagon Chili
Makes 8 Quarts

6 cups dried beans – (2 cups each of Red kidney beans, pinto beans and small red beans)
11 cups water
7 tsp. kosher salt divided (4 tsp. for salting beans when they cook and 3 tsp. salt for chili)
5 lbs. of ground beef
3 cups onion, chopped
2 cups red bell peppers, chopped
6 tbs. chili powder
2 tbs. cumin
2 tsp. black pepper
3 tsp. garlic, minced
2 tsp. oregano
2 tsp. cayenne pepper
2 tsp. coriander (optional)
1 tsp. crushed red pepper
2 quarts tomato juice
24 oz. of Salsa (Your favorite will do)
29 oz. tomato sauce
16 oz. beef stock
Washed beans

Wash beans thoroughly and put them in a large pot. Add cold water to a level of 2 to 3 inches above the beans and soak for 12 to 18 hours. Drain and discard water.
Soaked beans
Combine beans with 11 cups of fresh water and 4 tsp. kosher salt. Bring to a boil, reduce and cook for 30 minutes.

Meanwhile, brown ground beef, onions and peppers in a large skillet.
Drain off fat by spooning in a large colander in the sink. Shake out the excess fat. (The next two photos are of everything that went into the chili)
Everything that went into the chili

Pour meat into large pot and add 3 tsp. salt, pepper, chili powder, cumin, garlic, oregano, cayenne pepper, coriander, crushed red pepper, tomato juice, salsa, tomato sauce, and beef stock. Drain beans after 30 minutes and add to meat mixture. Simmer chili for 45 minutes or until desired doness.

Using sterilized jars fill leaving 1 inch head space.


Remove air bubbles and adjust head space if needed. Wipe rims of jars with dampened clean paper towel.

Process at 10 lbs. of pressure 75 minutes for pints or 90 minutes for quarts.
Chuckwagon chili
This is how it looks after it cooled, the next day.
Happy Canning!
~ FarmgirlPin It

Thursday, October 4, 2012

Hickory Smoked Salt

It has come to my attention that not everyone can find hickory smoked salt at the grocery store. I posted the recipe for my Ham and Bean Soup two days ago that has it as one of the ingredients and some have been asking about hickory smoked salt where to find it. So if you can't find any or just want to make it yourself here is my how to.

Hickory Smoke Salt
makes 1/2 cup 

1/2 cup sea salt (iodine free)
1 tablespoon of liquid smoke


Only ingredients you will need.

Mix salt and liquid smoke together. Add more sea salt or liquid smoke to resemble a wet brown sugar mixture.

 
Spread mixture out over a cookie sheet.

Allow to dry at room temperature or on a lowest setting in the oven. 150 degrees is the lowest setting for my oven. It only took about 30 minutes to dry.
Stir and rub salt mixture between fingers to break up often. If made on the aluminum foil you can just pull it up and sort of crumble it. Works great.
Room temperature salt is ready by the next day. Salt dried in the oven is ready in a few hours.
Store in an air tight container.
Final product Hickory smoked salt

Note: I only had course sea salt on hand. Which I used and I'm going to put it in the sea salt grinder which is in the picture. Remember you can make as much or as little of this that you like. The measurements I used can be reduced or doubled easily.

~ Farmgirl


Pin It

Tuesday, October 2, 2012

Budget: Tavern Ham

Budget: Tavern Ham

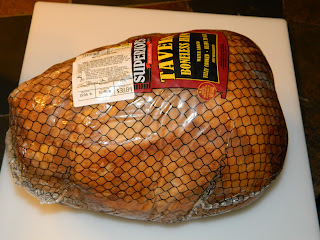
Recently I was at the grocery store and noticed that they had tavern hams on sale for $2.48 a pound. Pretty good price for around here. While pondering what all I could make of this ham the recipes were screaming at me. So I scooped one up and brought it home. When home this is when the real work begins.
 
This tavern ham weights 15.66 lbs @ $2.48 per lb for a total of $38.84. No food tax in the state of Ohio where I purchased it at.


I decided to slice up most of it. I had to borrow the slicer from my mother-in-law, as I don't have one of my own yet.
 
Because this slicer is smaller approx a 7.5 inch blade. I had to cut the ham into sections for easier sliceing.
 
Then it was time to run it on the slicer. I wish that I had someone here helping me to take pictures. But, I was on my own! Why does this not surprise me? Anyhow, this is most of the ham.


Make sure that you have plenty of freezer safe bags. A good sharpie to date your packages. This is how I divided mine up. 

 
What I got was 9 quart bags of sliced ham, 3 quart bags of chopped ham, 1 plate of scraps for the animals and 1 bowl for soup. You can obviously divide it up in many different ways. I should have kept a small section ham for baking it would of been good but I forgot to do that.
 
The kitties with their snack.
With the ham in the bowl I decided to turn it into soup. Which I canned. You can find that recipe posted yesterday.
7 quarts of Ham and bean soup made with great northern beans
 
7 more quarts of Ham and bean soup made with navy beans
 
So how does this play out for budgeting do you ask? Well 27 full meals from a 15.66 lb ham for a total cost per meal of $1.43. Now that's savings!  
 
If you purchase a ham let me know how you divide yours up for a savings. I'll be posting more budget meals that I use the ham in in the near future.
 
~ Farmgirl

Pin It

Monday, October 1, 2012

Canning Navy Bean and Ham Soup

I'm still stocking my shelves for winter. I want some easy soups for my husbands lunches or a quick meal when we are running on borrowed time. I have finally figured out a way to successfully can bean soup without everything turning to mush. Thanks to a simple recipe of "Ben's Beans."
Here's my recipe:

Navy Bean Soup
2 lbs dry navy beans, rinsed
half of small onion diced
1-2 medium carrots diced
1 stalk of celery diced
1 cup of diced ham
chicken bouillon, powder
hickory smoked salt
water
7 quart jars, lids and rings

I prep my jars first by washing them and get my lids and rings in hot water. After this I cut up my vegetables and ham. Lastly, I sort my beans, wash with cold water and let drain well.

Then in no particular order I add the following in each quart jar:
3/4 cup dry navy beans (do not soak beans), rinsed
1 Tbsp onion, diced
3 Tbsp chopped ham
1 Tbsp carrot, diced
1 Tbsp celery, diced
1/4 tsp hickory smoked salt (any seasoned or plain salt will work or omit)
2 tsp chicken bouillon, powder


After this I add water to fill to the 1 inch head space. Wipe rim of jar with clean cloth. Affix lid and ring and place in pressure canner.

Process for 90 minutes at 10 lbs of pressure.
The beans in these jars are great northern beans. Any kind of beans will do.


If you choose to reduce to pints you would need to reduce everything by half and process 75 minutes at 10 lbs pressure.

If you make ham and bean soup let me know of any changes you made to the recipe. It's always nice having several different versions of bean soup.

~ Farm girl


Pin It