Thursday, December 29, 2011

Mr. Squirrel

Mr. Squirrel making his way down out of the pines and across the old fallen down barn to cross the foot bridge over the creek to get the black walnuts he has claimed as his. He makes the same trip day after day. At least I think its the same one.

This little guy keeps taking off with my black walnuts. He appears to be pretty healthy and will continue to live this winter with as many has he has snacthed up. I haven't seen him in a few days. It's been really cold and the kids running in and out of the house. Haven't really heard any chatter from the squirrels. Hopefully, come Monday he will return. If there were a few more then they would end up in a pot of stew. Just not worth it for just one. He's pretty smart by telling his friends to stay back.

For now he lives another day. I'll go on watching him as he's pretty entertaining.

~Farm girl


Pin It

Turkey a la King


Just what do you do with all your Thanksgiving turkey leftovers? For me I freeze as much as I can for quick meals later on. This dish is usually made with chicken and I just swapped it out with turkey breast meat. Simple to make and the whole family enjoyed it.

Ingredients
1 (4.5 ounce) can mushrooms, drained, liquid reserved
1 green bell pepper, chopped
1/2 cup butter
1/2 cup all-purpose flour
1 teaspoon salt
1/4 teaspoon ground black pepper
1 1/2 teaspoons chicken bouillon powder
1 1/2 cups milk
1 1/4 cups hot water
1/2 cooked turkey breast, chopped
4 ounces chopped pimentos (optional)
1 cup frozen corn
1 cup frozen peas

Directions
Cook and stir drained mushrooms and green pepper in butter or margarine over medium heat for 5 minutes, Remove from heat.

Blend in flour, salt, and pepper. Cook over low heat, stirring constantly, until mixture is bubbly. Remove from heat.

Stir in instant bouillon, milk, water, and reserved mushroom liquid. Heat to boiling, stirring constantly. Boil for 1 minute.

Stir in turkey, pimiento, peas, and corn. Heat through.

Serve over mashed potatoes, noodles, rice or biscuits.

~ Farmgirl


Pin It

Wednesday, December 28, 2011

Angel Biscuits


A nice flaky biscuit that goes with just about anything. I was so delighted when I found this recipe; as I have tried many in the past and have not had very good success. So to my suprise these were just what I was looking for.

Ingredients
1 (1/4 ounce) package dry yeast
1/2 cup warm water
1/4 cup sugar
4 teaspoons baking powder
1/2 teaspoon baking soda
1 teaspoon salt
4 1/2 cups all-purpose flour
2 cups butter milk (make your own with 2cups milk and 1 tablespoon white vinegar, let sit unti it curdles, about 10 minutes)
1/2 cup shortening.

Directions
Dissolve yeast in warm water. Mix all dry ingredients and combine with liquids.
Place in refrigerator until ready to use. Stores up to two weeks.
When ready to make:
Take out the amount you want to use and leave the rest in the refrigerator.
Roll out and shape into biscuits on a lightly floured surface or drop by the spoonful onto a lightly greased baking sheet.
Bake at 375 degrees for about 20 minutes or until browned on top.

Makes approx. 48 biscuits

*Note: May make these up and keep batter covered in fridge for up to 2 weeks.

Angel biscuits hidden under there somewhere.
Recipe orginal poster Mama's Kitchen.

~Farmgirl
Pin It

Monday, December 26, 2011

FREE Photos / 25 FREE Prints with Promo Code

Free Photos from Walgreens.

Walgreens Photo is offering yet another great deal on photos! You get 25 Free  4x6 prints when you use promo code PRINTNOW at check out. You can choose in-store pick up, making your purchase absolutely FREE or have them shipped instead of picking them up shipping cost $1.97 depending where your located. One code per transaction and valid through 12/31/11.

Get a few of your holiday favorites for absolutely nothing. 

* Note: This is not a coupon site. It however is a site to for me to share my recipes, thoughts and anything I so freely feel that needs sharing. Photography is a passion of  mine and the memories are even better when I can hold them in my hands. Therefore anytime I find a great deal on photos you will see the links/ads here. Enjoy!

~ FarmGirl


Pin It

Cranberry Salad

I don't know why its called cranberry salad when truely its just a cranberry jell-o. Unless you put something in it like apples and walnuts and pineapple now that would be a salad of sorts. This is the recipe that I got from my mother-in-law. From what I understand this was her mothers recipe.
Cranberry salad a nice thick and set up jell-o.
Cranberry Salad


12 ounce bag, whole cranberries washed and drained
2 small oranges
1 ½ cup sugar
1 box Jell-O Raspberry
1 box Jell-O Cherry
1 ½ cups boiling water
Ice cubes (to start jell process)

In a blender, blend cranberries and oranges till desired chunkiness or smooth. Add sugar and blend till mixed well.

In a large bowl dissolve Jell-O into boiling water when dissolved add ice to begin the setting process. 

Remove what little ice is remaining. Add to Jell-O cranberry mixture and stir till combined.

Cover with saran wrap and put in fridge to set up. Make this the day before to ensure a good set.

*Note: You can adjust the sugar and it will have no affect on the set. I usually cut the sugar down to anywhere from 3/4 cup to 1 cup. And there you have it a nice and thick jell-o that goes well with turkey and also slathered over a hot dinner roll. Now, I'm going to have to make some more just because there was none to bring home for leftovers.

~FarmGirl
Pin It

Sunday, December 25, 2011

Christmas 2011


I've had our Christmas tree up since just before thanksgiving. I just knew that this month of Decemeber was going to be very busy for us and it ended up being just that to busy to think. I normally trim the tree with a theme but this year I didn't. I just did mulit color lights and put on anything that was pretty and handy since I didn't get out all of our decorations. This is how Mr. Christmas tree turned out. Not to shabby.


And when lit up Mr. Christmas tree was so pretty. Here it is the week of Christmas and I realized that Mr. Christmas tree must be getting tired. We have not turned out the lights at all since I put him out for display.


Check out who made a bed under the tree. Sox thought the tree skirt was the perfect place to lay. He's going to be so mad when the tree starts filling up and theres now place to go. 

Oh look, Santa has finally arrived right on time. Just as I had suspected he would. The kids were so glad that he didn't arrive early. The temptation really gets the best of them. 


So be, this is how the Christmas tree ended up. I hope everyone had a very Merry Christmas this year.

~ FarmGirl


Pin It

Thursday, December 22, 2011

Peach Oatmeal Crisp

Just ones of those easy recipes to throw together when your in the mood for something sweet but not too sweet. Even my teen aged daughter found this to be easy to make.

1 can (29 ounces) sliced peaches in juice
2 teaspoons ground cinnamon, divided
1/2 teaspoon vanilla
1 tablespoon cornstarch
1/2 cup uncooked quick oats
1/4 cup flour
1/4 cup packed brown sugar
3 tablespoons margarine, melted

Preheat oven to 375 degrees. Grease 8-inch square baking dish; set aside. Drain peaches, reserving liquid in glass measuring cup.

Combine peaches, 1 teaspoon cinnamon and vanilla in medium bowl. Add enough water to reserved peach liquid to make 1 cup; stir in cornstarch until dissolved. Add cornstarch mixture to peaches; mix well. Place in prepared baking dish.

Combine oats, flour, sugar and remaining 1 teaspoon cinnamon in small bowl. Pour margarine over mixture; blend with fork until crumbs form. Sprinkle crumb mixture over peaches.

Bake 20 minutes or until fruit is hot and topping is golden brown. Serve warm or chilled.

Makes 6 servingPin It

Freedom

Every morning for the past few weeks, I have been getting up to one lonely cow in my front yard. Over the summer it was the whole herd but for some reason lately its just been one. We don't normally mess with her till late afternoon as shes just grazing. Just the other day DH went and fixed some fence where he thought she was getting out. I laughed at him of course. I told him she would be out again and the very next day as I suspected she was standing in the yard yesterday.
Gertrude out in hay field along driveway.

Gertrude visiting my front yard yesterday.

Gertrude must really be enjoying my grass.

This morning it was Millie.
This morning it wasn't Gertrude out. It was a young cow I'll call Millie. I'm sure my father-in-law has different names for them than I do. She is a little skittish compared to Gert. I just had to open the door and Millie was headed back to where she belongs. I now know where her sweet spot is. Which is where I suspected it all along. She's going to be really mad at me here in a bit because I'm going to go fix the fence where she crosses over. It really does take a woman to do a man's job!

Pin It

Monday, December 19, 2011

Black Forest Pie

'Tis the season to be sharing. We are now well into the Christmas season and with many parties to attend. I have found that this pie is a great addition to any Christmas dinner table. It's not only easy to make but its super yummy.
Pie before topping added.


Cherry topping added.
Black Forest Pie
Makes 1 9-inch pie

3/4 cup sugar
1/3 cup baking cocoa
2 tablespoons all-purpose flour
1/3 cup milk
1/4 cup butter or margarine
2 eggs, lightly beaten
1 can (21 ounces) cherry pie filling, divided
1/2 teaspoon almond extract, optional
1 unbaked pastry shell (9 inches)
Whipped topping, optional

In a sauce pan, combine sugar, cocoa, flour and milk until smooth. Add butter. Bring to a boil; cook and stir for 2 minutes or until thickened. Remove from the heat. Stir a small amount of hot mixture into eggs. Return all to the pan. Fold in half of the pie filling. Pour into pastry shell. Bake 350 degrees for 35 to 40 minutes or unti filling is almost set. Cool completely on a wire rack. Just before serving, mix 1/2 tsp. almond extract into pie filling, top with remaining pie filling and whipped topping if desired. 

Yeilds 6-8 servings
Pin It

Monday, December 12, 2011

Canning Venison

It's that time of year again! After, the long awaited deer season it's time to process this years harvast. Normally, I would process the venison as it's taken but this year is a little different. Beings that I was ill I decided that I would wait. So we froze everything that we wanted to can this season and now i'm ready to process it. 
Roughly cut off the bone in huge chunks. 
If you have ever eaten canned venison, you know its so good and so tender. It's amazing served over mashed taters, noodles or even rice. Canned venison is perfect for those nights that you are late getting in and need to put something together. 


Canning venison is extremely easy, that is , if you are familiar with pressure-canning. If you are not familiar with it, I sugguest buying the Ball Blue Book for the current year. This is the book on home canning, and everything in it can be trusted.


The first step in the process is to wash and heat your jars and lids properly, and prepare the canner. Cut out any excess fat from the meat. Then cut the meat into 1 inch cubes.


Add some beef bouillion to the bottom of the jars, about 1/2 cube to pints and 1/2 to 1 whole cube to quarts. Also add 1 teaspoon of canning salt to each jar. Place some onion slivers in each jar as you are filling the jars. Fill the jar within 1 inch of the rim (this is known as head space.) I alternate meat and onion so that it has layers the flavors. Pack each jar tightly.


Raw venison packed tightly in quart jars.
Do NOT add any liquid to the jars. It will make its own juices when it is processed. Take a second to wipe the rim of the jars off with a clean damp cloth and affix lids and rings. Process pints for 75 minutes and quarts for 90 minutes at 10 pounds of pressure. Please check your ball blue book for elevation differences.


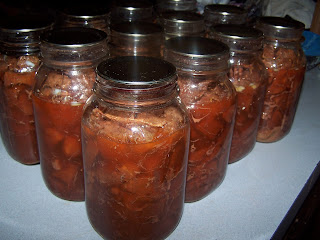
Canned venison with its own natural juices.
And here is the final product. 

* NOTE: Pictured above was 2 gallon freezer bags and part of a quart freezer bag. This meat yeilded 5 large mouth quarts and 1 pint. 

~Farmgirl

Pin It

Sunday, December 11, 2011

Sweet Rewards ~ Homemade peanut butter cups

Had an urge to make something sweet today. But, in order for me to make the sweet yummy goodness I bribed  my husband and son to cut all the venison meat off the bone for me. Something I really dislike doing. I held my end of the bargain up so they had to do their part. 


I know that my husband has a weakness for chocolate and peanut butter and I used it to my advantage. 


Step two adding the peanut butter filling.


He just can't pass up milk chocolate and the smooth creamy sugary peanut goodness! 


Step three covring the peanut butter filling with remaining chocolate.


Good thing about Christmas time, its easy to score good chocolate and peanut butter on sale. 


Homemade peanut butter cups are so darn awesome!! Whats even better they are so darn easy to make. So do yourself a favor and take a few minutes out of your busy day and make up a batch of these awesome peanut butter cups!


Peanut butter cups after they have chilled out in the fridge.


Chocolate Peanut Butter Cups
Makes 12

1 (11.5 ounce) package milk chocolate chips, divided
1 cup peanut butter
1/4 teaspoon salt
1/2 cup confectioners' sugar


Trim 12 paper muffin cup liners to half of their height.
Place 1/2 chocolate chips in a microwave safe container. Microwave for 2 minutes, stirring after each minute. Spoon melted chocolate into muffin cups, filling halfway. With a spoon, draw the chocolate up the sides of the cups until evenly coated. Cool in the refrigerator until firm.
In a small bowl, mix together peanut butter, confectioners' sugar and salt. divide into the chocolate cups. Melt the remaining chocolate, and spoon over peanut butter. Spread chocolate to edges of cups.


Pin It

Monday, December 5, 2011

Past few months

For the last three months my DH has been home with me. See back in September he was walking across the yard and his 5th metatarsal broke. I was walking beside him and heard it break. It was one of the most disgusting things I have ever heard. This morning we went for his 4th and final orthopaedic surgeon appointment, in hopes of getting some good news. What we received was not so good news. Although my DH has been released to return to work tomorrow, finally
Farmer Steve is not feeling so great!


The stubborn bone has not filled in with bone or scar tissue. Basically, we were told that it may or may never heal,  and as long as there is no pain or very little pain present that we should do nothing else; but if he begins to have non-stop pain then he will require a screw and some more down time. Argh!

I'm sure tomorrow having the house to myself I am not going to know how to act. It's been a long three months with him here torturing me. LOL So if I start posting crazy in the next few days. It's simply because I have way to much time on my hands. I should be tied up with some finals but after that I'm free for a few weeks.

~ FarmGirlPin It

Saturday, December 3, 2011

Welcome to Farm Girl Tails


I would have never dreamed that I would be one of those people that would sit around and blog daily. But, with the encouragement of some of my friends (and some much needed writing skills practice), I am here and ready to tell my stories of living the farming life, sharing my recipe box and my everyday ramblings of being a housewife, mother of 2 teens and student.


I actually found a few blogs that I enjoy reading on a daily basis about the very things that I do and the way of living that my family has chosen. It's great to see that other people take pride in their farming and daily tasks just as we do. I look forward to reading their blogs on a daily basis and when life happens and they don't post, I really do feel lost and wonder whats going on in their life that has caused the absence. 


So with this being said, I am here with my own blog. I do hope that this blog turns out to be one of those blogs that people can't get enough of and return too. Bear with me as I begin my journey here on the web as a blogger. 


Welcome!


 ~ Farm GirlPin It