Showing posts with label Photos. Show all posts

Sunday, December 15, 2013

Pineapple Ham Loaf

A great change from the regular meatloaf. This very tender and very yummy loaf is a crowd pleaser. Great for taking to pot lucks or church gatherings.


2 eggs
1/2 cup milk
1 teaspoon Worcestershire sauce
3/4 cup dry breadcrumbs
1 1/2 teaspoons ground mustard, divided
1/4 teaspoon salt
1/4 teaspoon pepper
1 pound cooked ham, ground (about 4 cups)
1 pound ground pork
1 (20 ounce) can sliced pineapple
1/2 cup packed brown sugar

In a bowl, combine eggs, milk, worcestershire sauce, bread crumbs, 1 teaspoon mustard, salt and pepper. Add ham and pork mix well.

Shape into eight oval patties, set aside.

Drain pineapple, reserving 1/2 cup of juice. Place pineapple slice between each ham patty. (Refrigerate remaining pineapple and juice for another use.) Carefully place in an ungreased 9 inx 5 in x 3 in loaf pan.

Pat patties around pineapple to form a loaf. Combine brown sugar, remaining ground mustard and reserved juice; pour a small amount over loaf. Bake, uncovered, at 350 degrees for 1 1/4 hours or until lightly browned and meat thermometer reads 160 degrees, basting occasionally with remaining  juice mixture.

Original recipe from The Best of Country Cooking 2002Pin It

Wednesday, June 12, 2013

Tangy Spaghetti Sauce

This is a very mild spaghetti sauce. Thick and chunky just like we like it. I make this with the vegetables we grow from our garden. I have tried many different sauces and this is the first one that has wowed my DH. 
Makes 6 to 7 quarts
3 medium onions, chopped
3/4 cup banana peppers, chopped (Hungarian wax chili peppers)
3 tsp. garlic, minced
16 cups tomatoes, peeled, cored and chopped
2 cups green and red bell peppers, chopped
3 (12 oz) cans tomato paste
3 tablespoons brown sugar
1 tablespoon dried oregano
1 tsp. crushed red pepper flakes
2 tablespoons Italian seasoning
1/2 tsp. ground cumin
1 cup sliced portabella or button mushrooms
4 tsp. canning salt
2 tsp. dried basil
1 tsp. ground black pepper
lemon juice (per jar)

 Add all of ingredients to stock pot.

Heat to boiling. Reduce heat. Simmer, partially covered, for 2 hours. Stirring occasionally.

After it has simmered, add 1 tablespoon lemon juice per pint jar and 2 tablespoons lemon juice per quart, ladle sauce into hot sterilized jars, leaving 1/2 inch head space cap with two piece lids. Process pints 35 minutes and quarts for 40 minutes in a boiling water bath canner.

If you choose you can cool then ladle into freezer containers and freeze.

I also have this recipe posted on my food.com account. If you care to read the reviews you can see them here.

~ Farmgirl


Pin It

Monday, June 10, 2013

Crazy Cake ~ Review

So many recipes floating around and now circulating on facebook lately. Seems like the new craze. Beings I promised my husband a cake since none of us liked the previous cake I made and it was one I found on another facebook page, I just can't remember what one, at the moment, anyhow I made him another. Thinking I can't go wrong with chocolate.

So one of my facebook friends (Heather) posted Crazy Cake ~ Wacky Cake from It's a MOM thing yesterday. It looked pretty simple, I have all the items in my pantry and it is a one pan deal. Perfect size considering i'm trying to limit the sweets that I make and we consume. Not to terribly a lot of sugar either.

So here's what I think about about. Minimal dishes to wash (awesome), all staples in the pantry (even better). Chocolate (a way to my husbands heart is through his stomach). Cook time was spot on for my stove. Cake raised and was fluffy and moist (I really love that). Excellent flavor!!  Four thumbs up from my family.

So here's the recipe

Crazy Cake ~ Wacky Cake
1-1/2 cups flour
3 Tbsp. cocoa (unsweetened)
1 cup white sugar
1 tsp baking powder
1/2 tsp salt
1 tsp. white vinegar
1 tsp pure vanilla extract
5 Tbsp. vegetable oil
1 cup water

Directions
Preheat oven to 350 degrees F.

Mix first 5 ingredients in a greased 8" square baking pan. Make 3 depressions in dry ingredients - two small, one larger (see in photo #3 above). Pour vinegar in one depression, vanilla in the other and vegetable oil in third larger depression. Pour water over all. Mix well until smooth.

Bake on middle rack of oven for 35 minutes. Check with toothpick to make sure it comes out clean. Cool. Frost with our favorite frosting. Enjoy!

Tip- You can double this recipe; just use a 9x13 baking pan.

Have you tried any of the recipes you've seen on facebook lately? Share here some of your favorite recipes.

~ Farmgirl


Pin It

Friday, June 7, 2013

Whiskey Marinade for Beef, Chicken or Pork

I use this on pork loin chops and it yields a very flavorful and juicy pork chop.
1/2 cup whiskey
1/2 cup brown sugar, packed
1/4 cup olive oil
1/4 cup soy sauce
1/2 tablespoon garlic powder
1 tablespoon salt
1 tablespoon pepper

Whisk all ingredients together. Pour over meat and seal tightly and give a shake or two to coat meat.
Place meat in refrigerator, let marinate at least 3 hours but no longer than 24 hours.
Cook meat on grill.

Original recipe from food dot com

~ Farmgirl

Pin It

Thursday, June 6, 2013

Hearty Macaroni Salad

This salad speaks summertime to my family. Very refreshing and packed full of flavor. You can't stop at one serving.


4 cups cooked elbow macaroni
2 celery ribs, chopped
2 carrots, chopped
1/4 cup onion, chopped
1/4 cup sweet red pepper, chopped
1/2 cup cucumber, seeded and chopped

Dressing:
1/3 cup sour cream
1/3 cup mayonnaise
2 tablespoons spicy brown mustard
4 teaspoon vinegar
1/4 teaspoon dill weed
1/2 teaspoon salt
1/4 teaspoon pepper
2 tablespoons sugar

In a bowl, combine macaroni, celery, onion, peppers, carrots and cucumber.

In another bowl, combine the dressing ingredients until blended. Pour over salad and toss to coat. Cover and chill for several hours before serving.

Yield 8 servings.

~Farmgirl


Pin It

Wednesday, June 5, 2013

Feet Up

It's been a very busy few days for us here on the farm and away from the farm. Sunday and Monday my daughter and I went and visited my parents over in Ohio. I helped my mother plant her garden. We put in 120 tomatoes and 48 pepper plants. They had to cut their garden back because of some septic work they are about to have done. It's weird seeing only half of it planted as she cans a lot also.

Yesterday and today  here on the farm we mowed, weeded the edges of the yard and pasture. Cleaned rabbit cages and made some repairs. We also planted a row of peas, row of Lima beans, 2 pounds of onion sets, 15 hills of squash,  9 hills of cucumber, and sweet potatoes. We are about finished with the planting. I just want to add two more rows of corn and maybe another row or two of Lima beans (this fool picked up the wrong kind of Lima beans so I'm short just a little bit) and a small pumpkin patch.

Our son went and cut some small saplings so we could have some tomato stakes. We desperately needed them. I'm hoping to get the rest of them done this weekend. We got one-third of them done just before it started raining here this evening.
Just after the first small storm passed by.

I got my shower between storms and now my feet are propped up for the evening while I watch the CMT Music Awards.

Hope everyone is having a good evening.

~ Farmgirl


Pin It

Tuesday, June 4, 2013

Crockpot Apple Butter

One of the many comfort foods we enjoy. I love it slathered on homemade biscuits.

5 1/2 pounds apples, peeled and finely chopped (I use three different kinds of apples)
4 cups sugar
2-3 teaspoons ground cinnamon
1/4 teaspoon ground cloves
1/4 teaspoon salt

Place apples in a large bowl. Combine sugar, cinnamon, cloves and salt. Pour over apples and mix well.

Place in crockpot, cover and cook on high for 1 hour.

Decrease heat to low; cover and cook on low for 9 to 11 hours or until thickened and dark brown. Stir occasionally.

Uncover and cook on low for 1 more hour.

If desired, whisk until smooth.

Spoon into freezer containers, leaving 1/2 inch headspace. Cover and freeze.

Or ladle in hot sterilized jars, add 1 tablespoon lemon juice per pint, wipe rim, cap with two-piece lids and process in a water bath canner for 10 minutes.

Makes approx 9 1/2 pints


Pin It

Sunday, June 2, 2013

Mountain Berry Pie

A delicious pie for any occasion. Serve it up with a dollop of whipped topping or a scoop of vanilla bean ice cream. 

Pastry for double-crust pie

1 cup white sugar
1 pinch of salt
1/4 cup cornstarch + tablespoon cornstarch
1/2 teaspoon cinnamon
1 cup blueberries
1 cup strawberries
3/4 cup blackberries
3/4 cup raspberries
1/8 cup water
1/4 cup peach schnapps
2 tablespoons lemon juice
2 tablespoons butter or margarine

Combine sugar, cornstarch, salt and cinnamon in a large saucepan.

Stir in berries and add water, peach schnapps and lemon juice.

Cook over medium heat just to the boiling point. It should be thickened. If berries are frozen this takes a little while longer.

Pour into pie shell and dot with butter.

Top with a lattice crust or full crust with slits cut.

Brush top with milk and sprinkle with sugar.

Bake at 350 degrees for 45 minutes.

~ Farmgirl


Pin It

Friday, May 31, 2013

Shaker Pickles

One of the best sweet pickles I have ever made. Super easy and delicious. I use them on sandwiches, burgers or just a nice side condiment. They have a nice crunch when you bite into them too.
10 medium cucumbers, sliced  (maybe more depending on the size of cucumbers)
4-8 onions, sliced

Fill gallon jar with sliced cucumber and onions (depending on taste).

Mix together:
3 1/2 cups sugar
3 cups distilled white vinegar
1/3 cup pickling salt
1 teaspoon alum
1 teaspoon celery seed
1 teaspoon mustard seed
1 teaspoon turmeric

Pour mixture over cucumbers and onions, cap the jar,  give it a shake, and place jar in refrigerator. Shake once a day for six days. Then pickles are ready for use. Store pickles in refrigerator, where they will keep for several months.

Although, this is not a canning recipe I am including it here because during the canning season I put up 6 or so jars for all year eating. Just make them at different stages of the canning season and you should be good to go all winter long. I label them clearly so I know how long they have been in the fridge. That is if I can keep them that long. I've been known to run out. Thanks to friends and family that snatch a jar or two during a visit.

~ Farmgirl


Pin It

Waikiki Meatballs

Beefy meatballs flavored with ginger, simmered in a sweet pineapple sauce.
Serves 6

Meatballs:
1 1/2 pounds ground beef
2/3 cup crushed saltine cracker crumbs
1/3 cup minced onion
1 egg
1/4 cup milk
1 1/2 teaspoons ground ginger
1/2 teaspoon salt
1 tablespoon olive oil

Sauce:
2 tablespoons cornstarch
1/2 cup packed brown sugar
1 (15 ounce) can pineapple chunks- drained, with juice reserved
1/3 cup distilled white vinegar
1 tablespoon soy sauce
1/3 cup chopped green bell pepper

Directions:
In a large bowl, combine ground beef, crack crumbs, onion, egg, milk, ginger and salt. Shape mixture by rounded tablespoonfuls into meatballs.

Heat olive oil in a large skillet over medium heat. Place meatballs in skillet and cook until evenly brown, and meat is no longer pink. Drain excess fat.

In a small bowl, combine the cornstarch, brown sugar, reserved pineapple juice, vinegar, and soy sauce. Mix until smooth, then pour into the skillet with meatballs. Cook, stirring constantly, until mixture thickens and boils, about 5 minutes. Stir in the green pepper and pineapple chunks. Heat through.

Serve over hot cooked rice or hoagie buns.

~Farmgirl


Pin It

Sunday, May 26, 2013

Oh my my, Strawberry Pie

There's nothing like celebrating the "unofficial" first day of summer with strawberry pie. So when I saw how quick and easy this recipe was I had to try it. It was gobbled up so fast that I didn't get a serving photoed. I'm thinking I will have to make another and make it soon. 


3 Tablespoons cornstarch
1 cup sugar
1 1/2 cups water
3 oz box strawberry Jell-o
2 cups sliced strawberries
Pre-baked 10" pie shell (click here for recipe)

Line bottom of pie shell with the sliced strawberries. 

Combine cornstarch, sugar and water in a small saucepan. Bring to a boil and simmer, stirring constantly, until thickened (this happens really quick). Add the Jell-o and stir until dissolved. Pour over the strawberries and refrigerate until set.

Serve with whipped cream.

~ Farmgirl


Pin It

Good friends; Good eats

I found out mid last week that I was going to have weekend visitors. My good friend Diane and her husband, Calvin was coming to my house. OMG! I just couldn't believe it. I thought for sure that if they got a chance to take a mini vacation that they would of went to the beach, but instead they were coming to see me. I felt special.
This is from our visit in Jan 2013.
See I met Diane and Calvin on-line about the same time we moved back to WV, so that's been nearly 9 years ago. We chatted on-line 6 years before we got to meet for the first time in person. This weekend was the third time we've got together. We went and visited them down in VA in January.

This weekend we got to sit around and visit. We all went out for a little bit. I just hated that my husband missed almost all of it because he was working. Next time we'll have to do some planning so we all can visit. I foresee a trip in my near future.

I cooked up a storm just prior to their arrival. Saturday we had pulled pork sandwiches, pasta salad, coleslaw, baked beans, and strawberry pie. On Sunday I made beer-brined chicken, salad, and corn on the cob. Diane surprised me with a homemade carrot cake, which is my favorite. It was a great weekend filled with laughter and food. What a way to end the month of May.

I hope everyone had an enjoyable weekend.

~ Farmgirl


Pin It

Friday, May 17, 2013

General Tso's Chicken - Weight Watchers

I've always been a larger framed gal and I've always had to watch what I eat. I know there's many out there that think I cook and I don't pay attention to the calories and what not, but that's far from the truth. I have always said eat in moderation no matter what it is. But, this recipe I bring you today is one from Weight Watchers; although it don't taste like it. Believe it or not this is one of my kids favorites.


3/4 cup canned reduced-sodium chicken broth
2 tablespoons cornstarch
2 tablespoons sugar
2 tablespoons low sodium soy sauce
1 tablespoon white wine vinegar
1/2 teaspoon ground ginger
2 teaspoons peanut oil
2 medium scallions, chopped
2 medium garlic cloves, minced
1/2 teaspoon red pepper flakes or 1 dried chili, minced
1 lb uncooked boneless skinless chicken breast, cut into 2 inch pieces
2 cups cooked white rice, kept hot

In a medium bowl, whisk together broth, cornstarch, sugar, soy sauce, vinegar and ginger; set aside.

Heat oil in a wok or large skillet over medium-high heat. Add scallions, garlic and pepper and cook 2 minutes. Add chicken and cook until browned all over, about 5 minutes.

Add reserved sauce and simmer until sauce thickens and chicken is cooked through, about 3 minutes.

Serve chicken and sauce over rice. Yields 1 cup of chicken and sauce and 1/2 cup of rice per serving = 4 points.

Happy cooking!

~ Farm Girl


Pin It

Wednesday, May 15, 2013

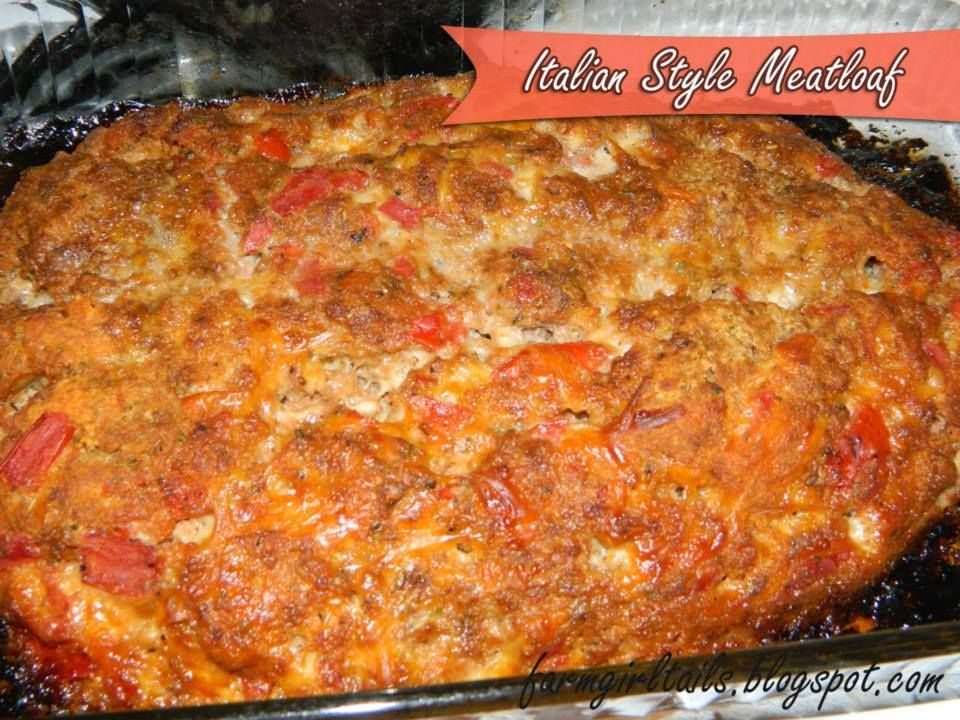
Italian Style Meatloaf

Your going to learn something new about me here today. I'm a freak for meatloaf. But, I don't like the same meatloaf over and over, so I try different ones every chance I can get. Why, well because burger is cheaper than steak and we also raise beef cattle so I always have an abundance of it. We'll usually I do. Just recently ran out. Bummer!

The Italian Style Meatloaf I'm sharing here today is a new one for us. I made it a few weeks ago. We really did enjoy it. With my family if you add cheese to it they'll eat anything.


1 pound ground beef
2 eggs beaten
3/4 to 1 cup bread crumbs
1/4 cup ketchup
1 teaspoon Italian seasoning
1 teaspoon dried oregano
1 teaspoon dried basil
1 teaspoon garlic salt
1 (14.5 oz) can seasoned diced tomatoes, drained (I used Hunt's Basil and Oregano flavoring)
2 cups shredded mozzarella cheese

Preheat oven to 350 degrees F.

In a large bowl, mix together ground beef, eggs, bread crumbs and ketchup. Add in the Italian seasoning, oregano, basil, garlic salt, diced tomatoes and cheese. Press into a 9x5 loaf pan if desired or shape into loaf log in a 9x13 baking dish, cover loosely with foil.

Bake 1 hour or until internal temperature reaches 160 degrees F.

Enjoy!

~ Farm GirlPin It

Sunday, May 12, 2013

Amish Cinnamon Bread


Super easy sweet bread. This no kneading, just mix it up and bake it bread. Makes a wonderful dessert or even quick breakfast.
Makes 2 loaves

Batter:
1 cup butter, softened
2 cups sugar
2 eggs
2 cups butter milk
4 cups flour
2 teaspoons baking soda

Cinnamon sugar mixture:
2/3 cups sugar
2 teaspoons cinnamon

Grease two 9x5 loaf pans. Set aside until needed.
Cream together butter, 2 cups sugar, and eggs. Add milk, flour, and baking soda. Mix well.
Put 1/4 of batter in each greased loaf pan.
Mix in separate bow the 2/3 cup sugar and cinnamon. Sprinkle 3/4 of the cinnamon mixture on top of the batter in each pan. Add remaining batter to pans; sprinkle the remaining cinnamon topping. Swirl with a knife. Bake at 350 degrees in a preheated oven for 45-50 minutes or until toothpick tester comes clean.

Cool in pan for 20 minutes before removing from pan.

Excellent if eaten warm out of the oven but great toasted with a little butter or cinnamon butter.

Enjoy!!

~ Farm Girl


Pin It

Saturday, April 27, 2013

Operation Pig Pen

The past two days have been extremely busy here on the farm. We finally located a few pigs for my son's FFA fair project. We didn't think that we were going to be able to get his project underway but with the help of a few friends and unsuspecting souls it got underway and completed in just two days.

The prime location for the hog pen would of been up in the tree line but that wasn't possible as it stays to wet there and we couldn't have them to far from a water source. The only choice we really had was to remove part of the falling down barn and locate them there. Okay this is probably a blessing in disguise.

Day One:
BEFORE picture. At least 120 year old barn crumbling. 

After picture. 
We couldn't clean up the whole building as behind it is pasture and is holding in one bull that will be going to the butcher shop soon. The building is acting as a fence. Sometime next week we will have to build new fence so that we can remove the rest for more expansion. 

We had to move all the debris from the barn across the creek and to our burn pile. It don't seem like much but, really it was. I know I had a good chunk of it all cleaned up before my son and husband made it back from Farmer Bob's. 
This will be burned. Hopefully very soon.
After having a cleared lot to work with they drilled holes for the posts which was a fallen down yellow locust tree, thanks to storm Drencho last end of June early July. 
Drilling post holes
Measuring for the next hole
All posts set 
It seemed like it took forever to get to this stage of the build. There was a lot of father and son bonding going on too. I hope that our son learned a lot from this build. And now we are ready to start putting up the side boards. The lumber used for the sides is lumber that was timbered off the farm back in 1991 and 1992. It had been piled up in the old shed since then. 

Saw mill lumber from the farm. At least 24 years old.
Add the side boards.
And like any other off the cuff builder some of the plans changed and the bedding area of the pen was moved to a different location. It was suppose to be off to the right but it got put on the back. 
Added bedding area
Thankfully my sons friend showed up after school to help them. It made my work a little easier as I was pulled away to go and work my sons mowing job. I do this from time to time when he has track meets, football practice or camp. Building the pig pen was really important so I tackled the mowing. 
Getting the roof done
They wanted to get the roof done before the extra help was gone. I don't blame them. There was no way I was getting up there to tack the roofing on. 
This scared the ba jibbies out of me. But, boys will be boys.
I think they were having a good time, anyhow.
Last thing few nails before we called it a night.
Not much more light to work in.
This was the finish of day one! We were so thankful to have the Son's buddy to help. My son helped him build his pig pen so it was payback time for him. 

Day Two:
Moved along pretty fast as much of the work was done. We only had to finish putting up the walls and make the door. On this day it was only our Daughter, Myself and Daddy working. Our son has a job at the local stock market with his buddy and they had to go to work. 

We spent the first part of the morning going to the stock market to pick up the piggies. This was our meeting place of choice, plus we had some paper work to do. 
Piggies in the stock trailer. Ready to go to their new home.
So we made it home around lunch time and got straight to work. It was rather warm yesterday and we didn't want them to stay in the trailer too long. We finished up the hut and put the door together and on the cage then turned the piggies loose in the pen while we were finishing up the sides. 
Now that's a door!
Completed hut!
Sissy helping out too!
Completed Pig Pen
Now that we have arrived at the completed Pig Pen. The only thing we have left to do is finish the watering system. Which will probably be completed early this week. We only need an elbow to install the self water. 
This whole pen cost us roughly around 25 dollars. When pulling the old barn down we found some door hinges from the old barn. Our only expense was the gas to run the chainsaw, diesel to run the tractor to drill holes and retrieve the fallen locust tree, and the two partial boxes of nails. Everything else came off the farm. 

This pig pen was probably an over kill but we shouldn't have to replace it anytime soon.

We took a page right out of Eustace Conway book. If you don't know who I'm talking about he is a naturalist. Living on Turtle Island Preserve in North Carolina. He's fighting hard to keep his land and to build and live as natural as possible. I first heard about him on television on a show called Mountain Men on the History Channel. Very, very interesting  man. 

But, back to what my real story is about. 
Meet Forest on the left and Bubba on the right.
One last photo of the happy piggies.


I learned a lot during my time out there with my husband and children. WE all worked together to complete a project that will give us many years of use.

Have a great rest of the weekend my friends.

~ Farm Girl


Pin It

Wednesday, March 20, 2013

Strawberry Cream Cheese Cobbler


Strawberry Cream Cheese Cobbler
1 stick (1/2 cup) butter
1 egg, lightly scrambled
1 cup milk
1 cup all purpose flour
1 cup sugar
2 teaspoons baking powder
1/2 teaspoon salt
2 quarts whole strawberries, capped and washed
4 ounces Neufchatel cheese, cut into small pieces
Plain Greek yogurt, vanilla ice cream or whipped topping for serving optional

Preheat oven to 350 degrees. Melt butter and pour into 9x13 inch glass baking dish. In a small bowl, mix together the egg, flour, sugar, baking powder and salt. Pour directly over the butter in the baking dish, but do not stir.

Add the strawberries arranging in a single layer as much as possible. Sprinkle cream cheese pieces over strawberries. Place in preheated oven and bake for 45 minutes, or until top is golden brown and edges are bubbling. (Crust rises up and around the fruit, but fruit will still peek out of top.)

Serve hot out of the oven with choice of topping, if desired.

Note: The berries will sink and become mushy the longer it sits out of the oven after baking. Best if eaten hot fresh out of the oven.


Recipe credit goes to Kitchenscoop.com 

You may be interested in these:
  
Pin It

Loaded Potato & Buffalo Chicken Casserole

Loaded Potato & Buffalo Chicken Casserole


2 pounds boneless chicken breasts, cubed 1 inch (I use chicken tenderloins)
8 to 10 medium potatoes, cut in 1/2 inch cubes
1/3 cup olive oil
1- 1/2 teaspoons salt
1 tablespoon black pepper
1 tablespoon paprika
2 tablespoons garlic powder
6 tablespoons hot sauce

Topping:
2 cups fiesta blend cheese
1 cup crumbled bacon
1 cup diced green onion

Preheat oven to 500 degrees.

Spray a 9x13x2 inch backing dish with cooking spray. 

In a large bowl mix together the olive oil, salt, pepper, paprika, garlic powder and hot sauce. Add the cubed potatoes and stir to coat. Carefully scoop the potatoes into the prepared baking dish, leaving behind as much of the olive oil/hot sauce mixture as possible. Bake the potatoes for 45-50 minutes, stirring every 10-15 minutes, until cooked through and crispy and browned on the outside. 

While the potatoes are cooking, add the cubed chicken to the bowl with the leftover olive oil/hot sauce mixture and stir to coat. Once the potatoes are fully cooked, remove from the oven and lower the oven temperature to 400 degrees. Top the potatoes with the raw marinated chicken. Top with cheese, bacon and chives.

Return the casserole to the oven and bake for 15-20 minutes or until chicken is cooked through and topping is bubbly.

Serve with extra hot sauce and/or ranch dressing.

Note: I don't find this spicy at all. If you want some kick add your favorite powdered buffalo seasoning or some ground cayenne pepper to the seasoning mix.


Pin It

Saturday, January 5, 2013

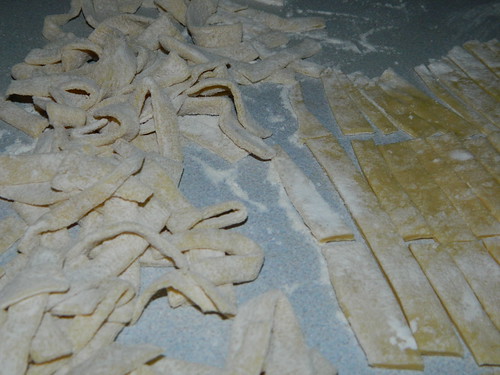
Homemade Egg Noodles

I watched and helped my grandma and mother make noodles for years. But, they never used a recipe and never talked about what they put in them. I was the basic gopher and noodle tray holder. On several occasions I got to cut some of the noodles.

When it came time for me to make noodles on my own I was scared to death. First few times they weren't to bad but they could of been better. Some twelve years ago I found an awesome little cookbook and it has some great recipes in it. One of which is the egg noodles I'm about to share. Thank you Better Homes and Gardens for putting out great cookbooks such as the paperback I own.

Homemade Egg Noodles

1 3/4 cups all purpose flour
1/2 teaspoon salt
1 egg plus 2 egg yolks, slightly beaten ( normally use farm fresh eggs brown eggs are best)
1/3 cup water
1 teaspoon cooking oil or olive oil

In a large mixing bowl stir together flour and the salt. Make a well in the center of the mixture. In a bowl combine eggs, water and oil. Add to flour mixture; mix well.

Sprinkle kneading surface with 1/4 cup of flour. Turn dough out onto floured surface. Knead till dough is smooth and elastic (8 to 10 minutes total). Cover and let rest 10 minutes. 

Divide dough into fourths. On a lightly floured surface roll each fourth into a 12x12 inch square (about 1/16th inch thick). Cut with a pizza cutter as desired.

Note- I prefer my noodles thicker so I say roll out to desired thickness. 
I do believe my Grandma Covey would probably tell me I did it all wrong with the thickness but to each their own. I'm glad I have the memories of going to her house and making noodles with her. 

~ Farmgirl


Pin It

Saturday, December 8, 2012

Porky Pie

As seen on the Chew this is my version of Michael Symon's (you can find his version here) Pork Pie. Like always, I can't make a recipe as instructed. So this is my take on his version. The fun thing about cooking is tweaking everything to your families liking. I have made a few recipes to a "T" but they are far and few in-between.
1 pound sausage (I used wild boar)
1 pound bacon, chunked
1/2 pound ham, chunked
1 medium onion, chopped
2 stalks celery, chopped
3-4 large baking potatoes, chopped
1 cup water
1 tablespoon parsley
1 tablespoon cilantro
1/4 teaspoon cayenne powder
1/4 teaspoon paprika
1/2 teaspoon salt
1/2 teaspoon black pepper
1 cup shredded cheddar cheese, + a handful more to toss on top of filling
2 pie crusts to fit skillet, (top and bottom)
1 egg

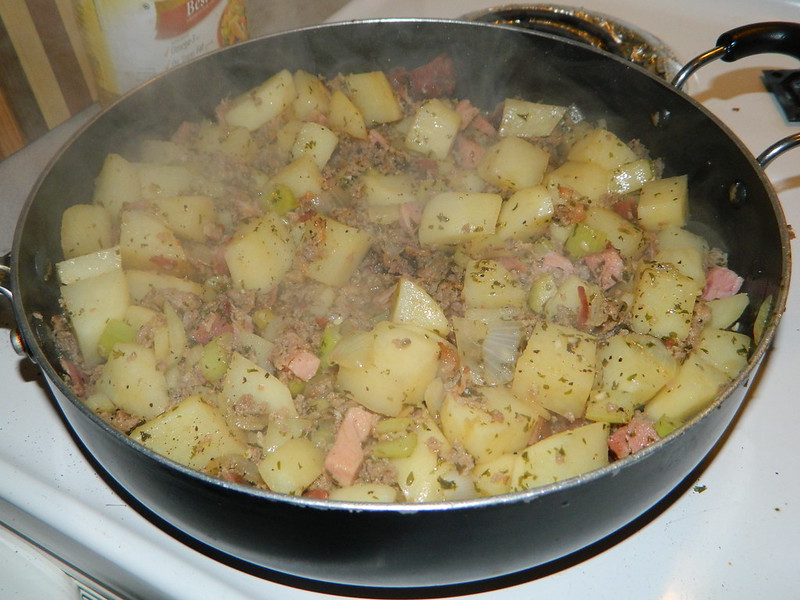
In a stock pot or large skillet cook chunked bacon until crisp or desired doneness. Remove from pan. Remove bacon fat if it you like. (I left bacon fat in, because the sausage I used is very, very lean.) In same pan cook sausage, until no longer pink.

Add ham, bacon, onion, and celery. Cook for 3 minutes. Add chopped potatoes, water, parsley, cilantro, cayenne powder, paprika, salt, and pepper. Mix well, cover and cook for 10 minutes or until potatoes are al dente. Stir several times.
While the meat and potatoes are cooking this is a good time to make your pie crusts. I used a recipe from my Better Homes and Gardens New Cook Book copyright 1989. I've been using this no fail recipe for years now. Double Pie Crust recipe found here.

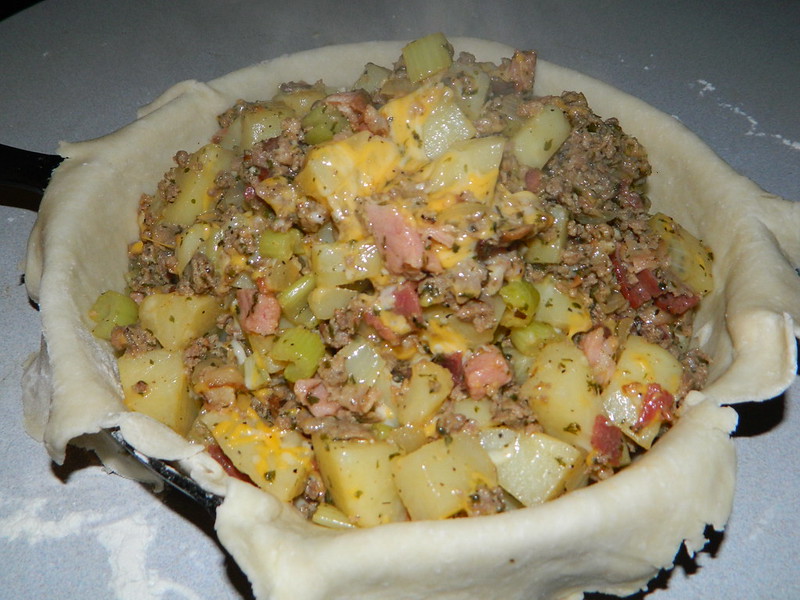
Preheat oven to 350 degrees. Roll out bottom crust and fit to skillet and spoon filling into pastry shell.
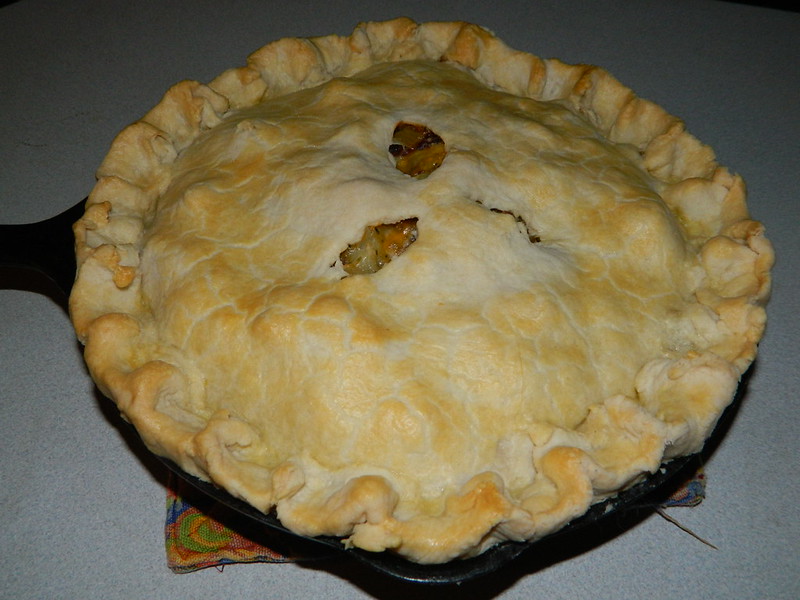
Add the extra handful of cheese if desired to the filling. Cover with top pastry shell. Roll edges, cut slits in top and brush with egg wash.
Bake in preheated 350 degree oven for 45 minutes or until top is golden brown. When done let rest out of oven for 10 minutes before serving.
This turned out better than I expected. It's also perfect for my husband as he is a meat and potatoes kind of guy. Three meats put him in hog heaven. You can serve this with a nice salad. However, this time I served it with creamed peas and it reminded me of something my grandmother would of put on the table. Nice rustic meal.


Pin It