Sunday, April 29, 2012

It's a beautiful morning....

after the heavy down pours we had yesterday afternoon and into the evening hours; I wake up to these sights right out my front door and off my porch. Also, the birds a chirping and singing, some of the cats a meowing looking for their breakfast and of course the rattle of the water bottles on the rabbit pins.

looking across my yard, garden and the hay field.
Sun so bright it has muted the colors of the trees across the main road.

looking across the yard/garden, driveway and creek above the
neighbors property is that beautiful sun beaming down upon us.

These are the sights I love to see, not houses stacked on top of each other. Country life is where I belong. Enjoying every minute of this fine morning. 

~ Farm girl


Pin It

Monday, April 23, 2012

Momma Sprite

Sprite hiding behind her nest

After a lot of waiting and wondering if she was ever going to have those little buns she finally did sometime after dark it got to dark to go check on her. So from 11 pm last night till early this morning she had them. I was expecting to see maybe 6, after 6 both DH and I were shocked with each reach in. 12 in all and only one passed away. It was smaller than all the other ones. 11 kits to feed, oh WOW! 

You can see the wrinkles on its little buttix! So cute.


I'm happy she did a wonderful job now I hope it warms up and they do good. I'll post pictures later on in the week of them.
Have a wonderful week

~ Farm Girl


Pin It

Tuesday, April 17, 2012

Interesting driveway signs


On our way home from getting bunnies we saw these signs just a few drive ways  from where we picked our bunnies up at. Intersting to say the least. I had a bunny on my lap or I would of got the other side of the Tourist Info Center sign.
Signs at the end of a drive way in Apple Grove
Here's a close up of each sign. We got such a chuckle of out these signs. They either have a sense of humor or there is a real problem in this area. From an out sider looking in this would be the perfect place to raise children. Its a great looking area the houses were nice and yards were all clean. Who knows whats the real issue but we liked the signs.
The smaller directional signs indicate how far its to the next few towns.
I didn't really see them as we were going in but coming back out this road
it is clear as to what they say. Sorry took the picture through the side
glass window and caught some reflections.

I need one of these signs. We've been having problems with ATV's and other
vehicles trying to get down our driveway and into our pasture thinking it is
an old road for 4 wheeling. Obviously, its a private drive but if you look at any
local map it says it's a county road.

I'm pretty sure these people mean business. I wasn't about to go and find out the story behind them.

~ Farm Girl

Pin It

Monday, April 16, 2012

Lesson learned

Never ever take someone else's word for it when it comes to sexing rabbits. Make it a point to double and even triple check the sex. Our Dolly ended up not being a Dolly and now I think he's mad at me because we have put him in with Clyde and things just didn't go so well.
So embarrassing! 
We got to checking and well things just didn't look right to say the least. So back to moving the new cage back across the creek and "Dolly" got a new name and a new home across the creek with the other bucks. Hopefully he will be happier with his kind. 
Meet Jim Bob! Don't ask DS named the poor guy.
So from now on I'm going to check and double check until I know for sure that he or she is infact he or she.We checked him this evening and he seemed to be fitting in well. 

Alls well here at Circle E Farm this evening

~ Farm Girl


Pin It

Sunday, April 15, 2012

Another building day...

Seems like the only day that we get a chance to build anything is on Sunday anymore. Today is no exception DH and DS are out building yet another rabbit hutch. This time they are doing some modifications since we have some lovely chewers. LOL

First they revamped Jumpin' Jacks cage. We hate this cage very much its been a pain in our butts since we have brought it home. We thought we would be using it for back up only but that just hasn't been the case yet.

Added a support across the top then a support slightly off center so they could add the door. It had a wire door on it and it just made it next to impossible to get into it. Now we can open the door quickly if needed. 

Next up:
This pile of wood will soon turn into a duplex. Soon I hope we will have enough of them. We like the cages made this way instead of the ones bought from the store. Ours are much bigger and easier to clean I believe. But, you know how that goes everyone has their own opinions. See photos below.
Transporting it over across the creek.


These are the cages we bought over in Jackson. The set of 10 cages to the left is for weaning  and the set to the right is our ladies. They are the biggest of the all metal cages. Our hopes is to change the whole arrangement. That has to wait till we get enough supplies to build our building around our cages. 

The real work begins another duplex is being raised! Our new bunnies will be happy when we get them. Jordan and I did some work on some of the cages across the creek. We made a much bigger space for our baby bunnies as our New Zealands are getting mighty big. 

Hopefully I can talk the DH and DS to start on our garage in a box. We bought it months ago and it needs to be put together. maybe we will see progress soon.

Have a wonderful day

~Farm Girl ~

Pin It

Friday, April 13, 2012

Pic of the Day

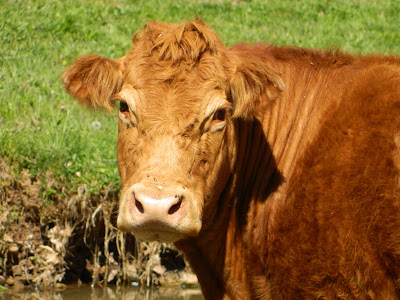
She's checking me out one last time before they head into the next feild. She kind of looks sad here. I hope that's not the case. We like happy cows! 


Have a wonderful weekend!!

~ Farm Girl ~

Pin It

Wednesday, April 11, 2012

Our newest bunnies


We made a trip to central Ohio over this past weekend to get some new bunnies for our rabbitry. While we were there we got one extra he was so pretty and DD just couldn't allow him to stay behind. He was no use to the owner because he was related to all her other rabbits. He's going to be just fine here I'm sure of that.
Four male New Zealands

Cosmo

Reese
Reese is such a sweet bunny. I'm hoping that he will fit in just fine with my other bunnies. He loves attention and gives such sweet kisses. We also had a friend that ran into a pickle with their bunnies and we agreed to take them in and give them nice forever homes. The kids are so in love with them all ready. Each of our bunnies gets lots and lots of attention from the kids and us.

Astro

Cadbury

Now we need to add some new ladies to our rabbitry. We are on the hunt for the perfect match for our bunnies. Hopefully we will have some new litters this week. Can't wait to see what we get or don't get.

Happy Farming

~ Farm Girl


Pin It

Tuesday, April 10, 2012

Step back in time

Over our Easter vacation we found ourselves doing a little traveling like most people. We ended up in Rio Grande, OH visiting Bob Evans Farm. I haven't been here since I was a small kid, thats been quite sometime. Lucky for me they had quilts on display. I have been wanting to quilt for a very long time but I have not found the time. There was so much to see in the homestead and we learned a lot about making susage and how the bussiness came about. The tour of the quilts was very nice and once done with the tour you can vote on your favorite.

Here's a few pictures from our stop at the farm.


There's quite a bit to see. We however didn't get a chance to go hiking to several of the other historical structures. Hopefully since it's not to far from us we can visit another time and check out the Church and places up Beaver Creek. 

If you do get a chance to visit the Bob Evans Farm you won't be dissappointed. It's FREE and very interesting. What more could you ask for? 
Pin It

Monday, April 9, 2012

Sunday a day of relaxing....

Not on this farm. If there is work to be done we get it done. Especially if it's the only time that we have to do it.  We celebrated DS's birthday the day before while we were out of town. We took him to Longhorn Steak House. We loved their decor, the place was nice and clean, we had good food, server was less than friendly and rather slow, and we thought it was over priced. That's our only grips about the whole experience. Now we can say we tried it, didn't care for it and won't be doing that again! LOL We didn't let that spoil our trip though. We had a wonderful day and got a lot done.

Early Sunday we headed off to town to get supplies upon returning home we headed to the DH parents where we enjoyed Easter dinner with the family. The kids had an egg hunt. We stayed for a little chit chat then off to the house to begin on our project. We all got our hands in on the building of the cage. First time for everything for all of us. Pictures of our day follow:

Nephew getting in on the action!


All finished now everyone can rest easy for the rest of the evening. 

~ Farm Girl

Pin It

Sunday, April 8, 2012

Happy Easter


It's been a very busy weekend for us. We hope that everyone has a good Easter. The weather here is just beautiful and we spent every minute we could possibly out on adventures and making new memories.

God Bless everyone

~ Farm GirlPin It

Friday, April 6, 2012

Homemade Oven Cleaner

I'll be the first to admit I hate, I absolutely hate cleaning the oven. I have never found a cleaner that don't take my breath away and also actually cut the grease and grim. So, I just wipe up and go on. Well till now because I was on Pinterest last evening and came across a simple cleaner made right in my kitchen. No harmful smells that would send me gagging and in labored breathing to find fresh air.

So here's an easy way to clean your oven glass and the oven with no harmful toxins. This is a no brainer that I'm happy to share with you.


I wish I would of took a picture before I started but I was too eager to see if this really does work. You can just guess how bad the door was if you just take a peak at the inside of the oven. So what is that on the door you ask? 

Homemade Oven Cleaner

1/4 cup Baking Soda
Water

In a bowl add 1/4 cup of Baking Soda together with just enough water to make it soupy. 

Rub gently on oven surface and let stand for 10 to 15 minutes.

To remove take a damp wash cloth rub in circles to remove grease and grim. For stubborn spots use a scouring pad.


See it really does work. I had to use some elbow grease also but it was so worth it. I ran out of baking soda so I couldnt finish the oven. But, I will after I go to the store to get a new supply.

Let me know if you liked using this better than those chemical cleaners.

 ~ Farm Girl


Pin It

Wednesday, April 4, 2012

Organic Dandelion Jelly

A few years ago I got the canning bug something bad so I was trying all kinds of new recipes. I remembered hearing about dandelion jelly, so I scouted out a few recipes. I remember my Granny making jellies. Mainly apple jelly and grape jelly are the ones I remember most. I wouldn't think that my Granny would pass up making dandelion jelly since they are free and in most every ones yards every spring. So I talked myself into trying to make jelly. I personally welcome this time of the year when they start popping up, because all I can see is the yummy goodness that will fill my jars and the smiles it puts on my children's faces.

This is where it all begins
Find a good supply of dandelions. You will need a lot. To make it easier the big ones are the best because they yield more petals, but what ever you can find will do. We normally fill up a gallon ice cream bucket full.

I say "We" because she's lower to the ground and she's got a good strong back! This is my DD and she mainly picked all the ones I needed this time because my back has been hurting. But, no worries I had the camera documenting every move she made and sent here in the right direction every time for the best ones. Not like she couldn't see them because they are everywhere here. 
Now, this don't look like much but it really is. The bowl she was using is actually a huge flower pot. And actually she picked a few too many but you'll have that.You will want to make sure that all the dandelion heads are free and clear of bugs. Usually found are small ants, knats and sometimes snails. We found two baby snails just last night in our bowl. There was an extreme amount of pollen which is what makes the flavor so if you have allergies I would suggest find your allergy meds. 
Next step is getting all those petals off the heads. The first time I did this I made sure there was none of the green flower part. I have since learned that a little of the leafy part is fine its the milky part from the stem you want no part of, it will make the jelly very bitter. 

The easiest way is to use scissors
Cut right behind the head
Discard this part
This is what your left with

You need enough of those petals to fill a quart jar. I cut mine over the quart jar so I'm not guessing. Do not pack them in just fill to the top with the petals. This is the most time consuming part of the whole process.

RECIPE:
1 quart of lightly packed fresh organic bright dandelion flowers
2 quarts of spring water

Additional items:
2 tablespoons fresh squeezed lemon juice
1 zest of one lemon, optional
5 1/2 cups sugar
1 vanilla bean, optional
1 (1 3/4 ounce) package of dry pectin (Jel Ease purchased at save a lot)

Directions:
1. Using stainless steel pan, boil the flowers in 2 quarts of spring water for 10 minutes, cool and strain, pressing the liquid out of the flowers gently, then restrain through a coffee filter.

2. Measure 3 cups of the liquid, add the lemon juice, zest and pectin. Optional add 1 split vanilla bean.

3. Put into a deep jelly kettle and bring to a rolling boil, then add sugar and stir to mix well. (when you bring the sugar and mixture to a rapid boil it will  look foamy. Just stir quickly during the whole process.)

4. Stir and boil hard for 1 1/2 minutes, or until mixture sheets from a wooden spoon, skim, carefully remove vanilla pod, add a few drops of yellow food coloring if the color is not bright.

5. Ladle into sterilized jelly jars. Wipe rim with a damp cloth, affix prepared lids and secure with ring.

6. Process in a hot water bath for 5 minutes.

Note: You have will more liquid than 3 cups. In all the times I have made this its just been shy of 6 cups of liquid. I then add the additional water (for me its been approx. 1/4 cup if that) to make the 6 cups and you will have enough to make 2 batches of jelly.

This is the first round of straining. Squeezing the liquid from the petals.

Straining for a second time. Catches any stray petals and the pollen.
Deep golden color that resembles honey.

In order to get what you see in this picture you will need 6 cups of dandelion liquid, 2 boxes of dry pectin, 11 cups of sugar, and 4 tablespoons of lemon juice. DO NOT double in the pan. Make each batch separate. 
These are most of the items that I used in making the dandelion jelly. There's a few items missing like a wooden spoon and wisk. I'm sure you get the idea of what you need to have. 
Feel free to send me a message if you have any questions. This jelly is very simple to make and I hope that my  pictures help you out. My batteries went dead in the process and I missed getting some vital pictures. But, I intend to make one more batch before all the dandelions are gone for the season and I will be sure to add those pictures as soon as I can.

An additional note. If you don't have time to make your jelly right now. You can always freeze the boiled dandelion juice and thaw out in the fridge when your ready. 

Hope you enjoyed this tourtial on how to make organic dandelion jelly.

~ Farm Girl
Pin It