This is one way to use some of your home canned goodies. I pride myself in filling my shelves each year. I'm sad to see the jars disappear sometimes but when you can make a quick meal like this, its so worth it. Making dinner quickly after a busy day is what it's all about. (I forgot to take a picture, will post one the next time I make it)
6 medium potatoes, peeled and thinly sliced
1 pint whole kernel corn, drained
1/2 cup chopped green bell pepper
1 cup onion, chopped
2 cups fresh carrots, sliced
1 quart home canned beef roast chunks, drained
1 can (16 oz) tomato sauce
Salt and Pepper
1 cup (4 oz) shredded process cheese (Velveeta)
In a greased 13 in x 9 in baking dish, layer the potatoes, corn, green pepper, onion and carrots. Top with beef. Pour tomato sauce over top. Sprinkle with salt and pepper.
Cover and bake 350 degrees for 1 1/2 hours. Sprinkle with cheese. Return to oven till the cheese has melted. Let stand for 10 minutes before serving.
Layered beef casserole can be divided between two 1 1/2 quart baking dishes. Bake one casserole to enjoy now and freeze the other for another meal. Casserole can be frozen for up to 3 months. To use frozen casserole. Thaw in refrigerator over night. Bake as directed. Sprinkle with cheese before serving. Yield 8 servingsPin It
Showing posts with label On The Farm. Show all posts
Showing posts with label On The Farm. Show all posts
Sunday, December 8, 2013

Friday, December 6, 2013
Irish Soda Bread

Makes 1 - 9x5 inch loaf
3 cups all purpose flour
1 tablespoon baking powder
1/3 cup white sugar
1 teaspoon salt
1 teaspoon baking soda
1 egg, lightly beaten
2 cups buttermilk
1/4 cup butter, melted
Preheat oven to 325 degrees F. Grease a 9x5 inch loaf pan.
Combine flour, baking powder, sugar, salt and baking soda. Blend egg and buttermilk together, and add all at once to the flour mixture. Mix just until moistened. Stir in butter. Pour into prepared pan.
Let sit at room temperature for 30 minutes to allow time for the baking powder and baking soda to do what they are intended to do. This will create an airier loaf.
Bake for 65 to 70 minutes, or until toothpick inserted in the bread comes out clean. Cook on a wire rack. Wrap in foil for several hours or overnight, for best flavor.
This bread goes great with Corned Beef and Cabbage.
Pin It
Thursday, October 10, 2013
Winter Piggies
Got a call last Thursday about buying some pigs, something we weren't planning on doing. I just haven't been keen on having more animals to feed during the colder months; actually I'm trying to get rid of some extra animals. But, we don't have any extra pork in the freezer. So we ended up talking the in laws into buying a piglet also and splitting the feed cost.
Pin It
This is only the second time we have had pigs. Earlier this year we got piglets for my sons FFA project. Which he showed and sold at the county fair and he did very well. Guess we are going to get practice for next years fair.
These are a york mixed piglets. They have light black markings on their skin. Can't really see it for all their white hair. They are so cute I hope they turn out well.
Our little guy has a brother with him so he won't be lonely. Wilbur is smaller than the in laws piglet but is more aggressive. I love watching them argue over the chow. They are so funny. I'm hoping they will fill out fast and nicely so I don't have to worry about feeding into the new year.
 |
| Wilbur on the left, not sure what the in laws have named theirs yet. |
I need to get to reading about raising hogs, so that we can raise good quality pigs.
Happy homesteading
~ Farm Girl
Sunday, August 25, 2013
Bye-Bye Garden
I have been so ready to see this dreadful garden season go away. Finally, the husband and son got all the tomato stakes out of the garden. I was so glad when I heard the tractor fire up. I look out and this is what I see.


Pin It

Crazy that he used the mower to knock the dreadful weeds down. But, such a blessing now I can see across the yard and it don't look so bad from the main road.

Everything is gone except the very little sweet potato patch down at the far end of the garden. I'm not even sure if they bloomed so we may not have any sweet potatoes. In the next few weeks he'll plow the garden and we'll get all the rabbit droppings and hog manure put on it for the winter. Just maybe next years garden will be a success.
I wish I had the nerve to put in a fall or winter garden but, I feel its going to get cold quick. Which makes me think that the garden will not do any good. Cutting my losses this year and ready to move on.
~ Farm Girl
Saturday, June 22, 2013
Hot Pepper Butter

Makes 8 pints or 16 half pints
4 cups banana peppers, finely ground (36 large banana peppers or 40 medium banana peppers or 50 small banana peppers) can use any combination of peppers that you like
1 quart prepared yellow mustard
1 quart cider vinegar
3 -1/2 cups sugar
1 -1/4 cups flour (or 1 cup clear gel)
1 -1/2 cups water
1 teaspoon salt
Seed and chop peppers finely. (use gloves and food processor to chop the peppers tiny). Mix together sugar, salt, vinegar and peppers in stock pot. Boil 5 minutes.
Mix together flour clear jel and 1 cup water; to make slurry. Add yellow mustard, remaining 1/2 cup water and slurry to boiling peppers.
Cook until thickened, about 5 minutes.
Ladle into hot sterilized jars, cap with two-piece lids and process in a hot water bath canner for 15 minutes.
** Note Canning with flour is highly forbidden. I am conveying the recipe as it was orginally written.
I had a request for this a family member and didn't have any on the shelf. Seems like this happens a lot around here now that the kids enjoy hot foods. Good thing I noticed a few peppers ready in the garden to add with the ones I got at the store the other day. For the photo above I used 3/4 cup jalapenos and 3 1/4 cups of hungarian wax peppers.I think I need to make either some soft pretzels or summer sausage so we can enjoy a fresh jar been a while since we have had some around the house.
Be sure to use latex gloves when working with the peppers.
Happy Canning
~ Farmgirl
Pin It
Sunday, May 26, 2013
Oh my my, Strawberry Pie
There's nothing like celebrating the "unofficial" first day of summer with strawberry pie. So when I saw how quick and easy this recipe was I had to try it. It was gobbled up so fast that I didn't get a serving photoed. I'm thinking I will have to make another and make it soon.

3 Tablespoons cornstarch
1 cup sugar
1 1/2 cups water
3 oz box strawberry Jell-o
2 cups sliced strawberries
Pre-baked 10" pie shell (click here for recipe)
Line bottom of pie shell with the sliced strawberries.
Combine cornstarch, sugar and water in a small saucepan. Bring to a boil and simmer, stirring constantly, until thickened (this happens really quick). Add the Jell-o and stir until dissolved. Pour over the strawberries and refrigerate until set.
Serve with whipped cream.
~ Farmgirl
Wednesday, May 8, 2013
Early evening visitors
Sitting on the porch this evening waiting for the daughter to get home and out of the corner of my eye I see something moving over in the trees. Low and behold it was two squirrels feasting on the expired blooms of the wild cherry tree. Here are a few pictures of the critters visiting my yard.


Pin It
The bird landed on the feeder stand not 15 feet from me. It was so nice to see all the critters out and enjoy the day just as much as I was.
Hope everyone had a lovely evening
~ Farm Girl
Pin It
Operation Duck and Chicken Run
A few days ago I bartered a few jars of jelly for two ducks. I'm staring to get a hang of this bartering as I have done it a few times here lately to get things I needed or wanted for the farm and such. We got the ducks but didn't have any place to keep them. I couldn't turn them loose because my neighbors dogs would have them for an appetizer and I'm sure my two cats would chase them around and may even harm them. So we had them cooped up in travel kennel till we could get them something more fitting.

Pin It
It's been raining here for a few days. The husband and I got up early and used the early morning hours to build a makeshift run for them from items we had already here on the farm. I found a few ideas on pintrest that would work great! I'm loving that site.
So we took the old swing set I got for FREE a few years ago. Borrowed the timbers from my blueberry bed. Purchased the netting and used some leftover rabbit wire for their door. Hubby also borrowed a tarp that wasn't being used from his parents to make them a shaded and dry area for when it starts to rain hard again. I think we have a total of $12 in the whole thing so far. I want to paint the swing set just to help protect it from more rust.
Over all we are very pleased with how it came out and I know the ducks; Quackers and Cheese are very thankful for a large area to roam in.
 |
| Quackers and Cheese in the dog kennel |
 |
| Enjoying some fresh water. |
I'll take more pictures as I get the finishing touches on the run in the next few weeks.
Have a wonderful day!!
~ Farm Girl
Saturday, April 27, 2013
Operation Pig Pen
Day One:
 |
| BEFORE picture. At least 120 year old barn crumbling. |
 |
| After picture. |
We couldn't clean up the whole building as behind it is pasture and is holding in one bull that will be going to the butcher shop soon. The building is acting as a fence. Sometime next week we will have to build new fence so that we can remove the rest for more expansion.
We had to move all the debris from the barn across the creek and to our burn pile. It don't seem like much but, really it was. I know I had a good chunk of it all cleaned up before my son and husband made it back from Farmer Bob's.
 |
| This will be burned. Hopefully very soon. |
 |
| Drilling post holes |
 |
| Measuring for the next hole |
 |
| All posts set |
 |
| Saw mill lumber from the farm. At least 24 years old. |
 |
| Add the side boards. |
 |
| Added bedding area |
 |
| Getting the roof done |
 |
| This scared the ba jibbies out of me. But, boys will be boys. I think they were having a good time, anyhow. |
 |
| Last thing few nails before we called it a night. Not much more light to work in. |
Day Two:
Moved along pretty fast as much of the work was done. We only had to finish putting up the walls and make the door. On this day it was only our Daughter, Myself and Daddy working. Our son has a job at the local stock market with his buddy and they had to go to work.
We spent the first part of the morning going to the stock market to pick up the piggies. This was our meeting place of choice, plus we had some paper work to do.
 |
| Piggies in the stock trailer. Ready to go to their new home. |
 |
| Now that's a door! |
 |
| Completed hut! |
 |
| Sissy helping out too! |
 |
| Completed Pig Pen |
This whole pen cost us roughly around 25 dollars. When pulling the old barn down we found some door hinges from the old barn. Our only expense was the gas to run the chainsaw, diesel to run the tractor to drill holes and retrieve the fallen locust tree, and the two partial boxes of nails. Everything else came off the farm.
This pig pen was probably an over kill but we shouldn't have to replace it anytime soon.
We took a page right out of Eustace Conway book. If you don't know who I'm talking about he is a naturalist. Living on Turtle Island Preserve in North Carolina. He's fighting hard to keep his land and to build and live as natural as possible. I first heard about him on television on a show called Mountain Men on the History Channel. Very, very interesting man.
But, back to what my real story is about.
 |
| Meet Forest on the left and Bubba on the right. |
One last photo of the happy piggies.

I learned a lot during my time out there with my husband and children. WE all worked together to complete a project that will give us many years of use.
Have a great rest of the weekend my friends.
~ Farm Girl
Thursday, April 18, 2013
The Wide World of Canning
I belong to several canning groups on Facebook and other places. Lately, I have seen items being canned that just blow my mind. Like meatloaf, meatballs, sweet and sour chicken, ham and so on. Now I'm all for convenience and quick meals. I'm finding myself drawn to these things as easy meals for not only my family but things for my husband to take to work in his lunch pail that will take very little effort.
Thankfully, the art canning allows us the opportunity to know exactly what is in our foods. Unlike the quick meals in the stores. I know they are labeled at the stores but really what is some of that stuff we can't pronounce?
So anyhow, I grew up knowing the canning world as my mother and grandmothers have always done it for as long as I can remember. Now that I have been canning for 7 years on my own, many of the things I can is much different from the stuff that they canned. I remember many, many days cleaning potatoes, tomatoes and green beans for the both of them.
I'm so thankful for the Internet and the canning groups that have opened my eyes to the many different recipes and wealth of knowledge that has been provided for me to make such wonderful things. Just so you know I have yet to try the meatloaf, meatballs, and sweet and sour chicken and many other things. But, I'm slowly getting up the nerve to try them.
I now have over 2000 jars so I'm ready to spread my wings and try something new.
What are some of the things you have tried lately that you have thought long and hard about if it was worth the risk?
~ Farm Girl
Pin It
Thankfully, the art canning allows us the opportunity to know exactly what is in our foods. Unlike the quick meals in the stores. I know they are labeled at the stores but really what is some of that stuff we can't pronounce?
So anyhow, I grew up knowing the canning world as my mother and grandmothers have always done it for as long as I can remember. Now that I have been canning for 7 years on my own, many of the things I can is much different from the stuff that they canned. I remember many, many days cleaning potatoes, tomatoes and green beans for the both of them.
I'm so thankful for the Internet and the canning groups that have opened my eyes to the many different recipes and wealth of knowledge that has been provided for me to make such wonderful things. Just so you know I have yet to try the meatloaf, meatballs, and sweet and sour chicken and many other things. But, I'm slowly getting up the nerve to try them.
I now have over 2000 jars so I'm ready to spread my wings and try something new.
What are some of the things you have tried lately that you have thought long and hard about if it was worth the risk?
~ Farm Girl
Pin It
Saturday, December 8, 2012
Porky Pie
As seen on the Chew this is my version of Michael Symon's (you can find his version here) Pork Pie. Like always, I can't make a recipe as instructed. So this is my take on his version. The fun thing about cooking is tweaking everything to your families liking. I have made a few recipes to a "T" but they are far and few in-between.

1 pound sausage (I used wild boar)
1 pound bacon, chunked
1/2 pound ham, chunked
1 medium onion, chopped
2 stalks celery, chopped
3-4 large baking potatoes, chopped
1 cup water
1 tablespoon parsley
1 tablespoon cilantro
1/4 teaspoon cayenne powder
1/4 teaspoon paprika
1/2 teaspoon salt
1/2 teaspoon black pepper
1 cup shredded cheddar cheese, + a handful more to toss on top of filling
2 pie crusts to fit skillet, (top and bottom)
1 egg
In a stock pot or large skillet cook chunked bacon until crisp or desired doneness. Remove from pan. Remove bacon fat if it you like. (I left bacon fat in, because the sausage I used is very, very lean.) In same pan cook sausage, until no longer pink.
Add ham, bacon, onion, and celery. Cook for 3 minutes. Add chopped potatoes, water, parsley, cilantro, cayenne powder, paprika, salt, and pepper. Mix well, cover and cook for 10 minutes or until potatoes are al dente. Stir several times.
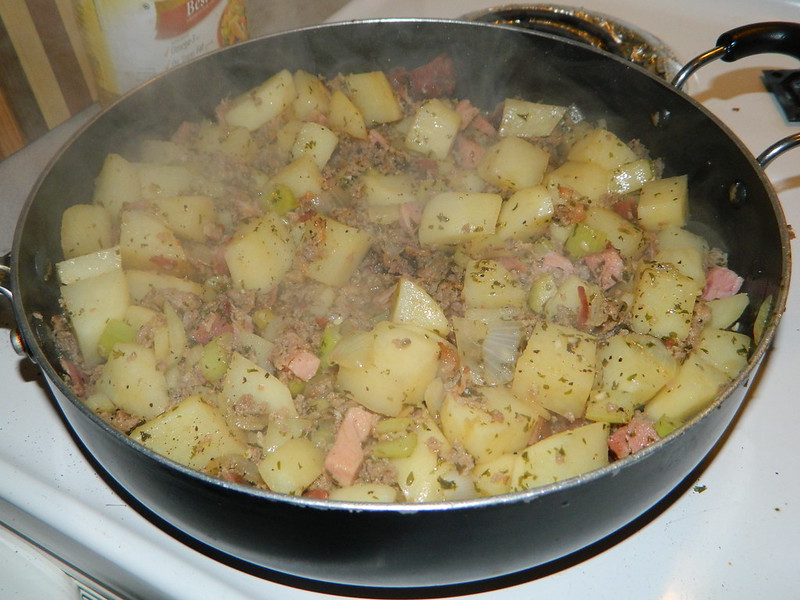 While the meat and potatoes are cooking this is a good time to make your pie crusts. I used a recipe from my Better Homes and Gardens New Cook Book copyright 1989. I've been using this no fail recipe for years now. Double Pie Crust recipe found here.
Preheat oven to 350 degrees. Roll out bottom crust and fit to skillet and spoon filling into pastry shell.
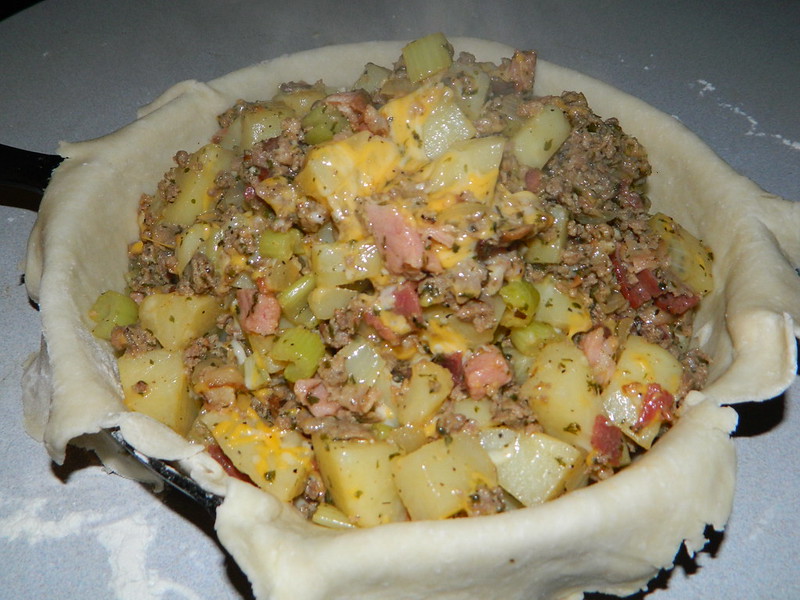 Add the extra handful of cheese if desired to the filling. Cover with top pastry shell. Roll edges, cut slits in top and brush with egg wash.
 Bake in preheated 350 degree oven for 45 minutes or until top is golden brown. When done let rest out of oven for 10 minutes before serving.
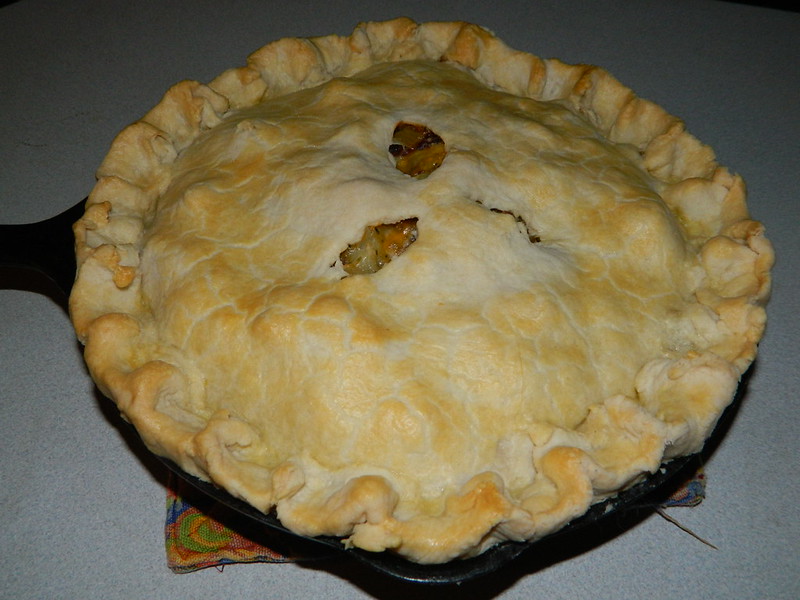 This turned out better than I expected. It's also perfect for my husband as he is a meat and potatoes kind of guy. Three meats put him in hog heaven. You can serve this with a nice salad. However, this time I served it with creamed peas and it reminded me of something my grandmother would of put on the table. Nice rustic meal.
Pin It
1 pound sausage (I used wild boar)
1 pound bacon, chunked
1/2 pound ham, chunked
1 medium onion, chopped
2 stalks celery, chopped
3-4 large baking potatoes, chopped
1 cup water
1 tablespoon parsley
1 tablespoon cilantro
1/4 teaspoon cayenne powder
1/4 teaspoon paprika
1/2 teaspoon salt
1/2 teaspoon black pepper
1 cup shredded cheddar cheese, + a handful more to toss on top of filling
2 pie crusts to fit skillet, (top and bottom)
1 egg
In a stock pot or large skillet cook chunked bacon until crisp or desired doneness. Remove from pan. Remove bacon fat if it you like. (I left bacon fat in, because the sausage I used is very, very lean.) In same pan cook sausage, until no longer pink.
Add ham, bacon, onion, and celery. Cook for 3 minutes. Add chopped potatoes, water, parsley, cilantro, cayenne powder, paprika, salt, and pepper. Mix well, cover and cook for 10 minutes or until potatoes are al dente. Stir several times.
Preheat oven to 350 degrees. Roll out bottom crust and fit to skillet and spoon filling into pastry shell.
Pin It
Friday, December 7, 2012
Pastry for single Crust Pie
1 1/4 cups all-purpose flour
1/4 teaspoon salt
1/3 cup shortening or lard
3 to 4 tablespoons cold water
In a mixing bowl stir together flour and salt. Cut in shortening or lard till pieces are the size of small peas.
Sprinkle 1 tablespoon of the water over part of the mixture; gently toss with a fork. Push to side of bowl. Repeat till all is moistened. Form dough into a ball.
On a lightly floured surface, flatten dough with hands. Roll dough from center to edges, forming a circle about 12 inches in diameter. Wrap pastry around rolling pin. Unroll onto a 9 inch pie plate. Ease pastry into pie plate, being careful not to stretch pastry.
Trim to 1/2 inch beyond edge of pie plate; fold under extra pastry. Make a fluted, rope shape, or scalloped edge. Do not prick pastry. Bake as directed in individual recipes.Pin It
1/4 teaspoon salt
1/3 cup shortening or lard
3 to 4 tablespoons cold water
In a mixing bowl stir together flour and salt. Cut in shortening or lard till pieces are the size of small peas.
Sprinkle 1 tablespoon of the water over part of the mixture; gently toss with a fork. Push to side of bowl. Repeat till all is moistened. Form dough into a ball.
On a lightly floured surface, flatten dough with hands. Roll dough from center to edges, forming a circle about 12 inches in diameter. Wrap pastry around rolling pin. Unroll onto a 9 inch pie plate. Ease pastry into pie plate, being careful not to stretch pastry.
Trim to 1/2 inch beyond edge of pie plate; fold under extra pastry. Make a fluted, rope shape, or scalloped edge. Do not prick pastry. Bake as directed in individual recipes.Pin It
Wednesday, November 21, 2012
Opening day of deer season
Around here deer season is a holiday. My husband takes all of his vacation during this time and we hunt as a family. This year is the first year we have let both of our kids go on the first day. I've always been afraid of too many hunters in the woods and someone getting hurt. But, this year I allowed our 14 year old daughter go and sit by me.
As we were walking to our spot she counted every gun shot that we heard. Sixteen was her final count by the time we sat down. I don't think she thought there were any deer left in the woods if everyone of those shots connected with its target. We weren't in our spot 10 minutes and her daddy came across the radio and said he got one. Now, she's really starting to look sad. She's not a very patient person. Five minutes go by and we hear another shot closer to us and Cousin Re-Re as we call him, gets on the radio and says he's got one down too. Oh the look on her face.
Not twenty minutes later, Jordan and I see our first deer of the day. She says she saw two but I never saw another one. I shot and missed as I had to pull all the way across my body which was near impossible for me to do. The deer came closer and closer to us. So I'm whispering to her Shoot!... ShOoT!...SHOOT! and finally she did. What a perfect shot she gave considering her gun gave us no pattern when we were trying to sight it in the day before. When she realized what she did the tears came a flowing by the buckets. She then called for her daddy on the radio to tell him. Everyone that was listening told her congratulations and daddy broke the news to her that she had to drag it out to the point as he couldn't reach us by four wheeler to help her. She wasn't like that but she did it. Way to go Jordan!
Here are other pictures from the first day.
 |
| Happy tears! |
Not twenty minutes later, Jordan and I see our first deer of the day. She says she saw two but I never saw another one. I shot and missed as I had to pull all the way across my body which was near impossible for me to do. The deer came closer and closer to us. So I'm whispering to her Shoot!... ShOoT!...SHOOT! and finally she did. What a perfect shot she gave considering her gun gave us no pattern when we were trying to sight it in the day before. When she realized what she did the tears came a flowing by the buckets. She then called for her daddy on the radio to tell him. Everyone that was listening told her congratulations and daddy broke the news to her that she had to drag it out to the point as he couldn't reach us by four wheeler to help her. She wasn't like that but she did it. Way to go Jordan!
 |
| Jordan and her first deer ever. Shot using a .410 |
Here are other pictures from the first day.
 |
| Daddy doing the dirty work. |
 |
| 5 point |
 |
| Cousin Re-Re's spike |
I didn't get a picture but my father in law got a 3 point also.
~ Farm Girl
Pin It
Saturday, November 17, 2012

Wednesday, November 14, 2012
Hamburger Stroganoff
One of the things that makes me super happy is finding base recipes that I can play around with. So this is the second recipe using the SOS mix. You can find the original recipe in the booklet Soup or Sauce SOS Mix put out by the Utah State University extension office which is located here.
Knowing my families tastes there is no way I could of put this on the table without tweaking it. My goal was for a creamier sauce with a little more flavor. I thought it was great without the extras added in the sauce but I'm just one of those people that has a hard time not tweaking.

1 pound lean ground beef or turkey
3 cups water
1/3 cup SOS Mix
2-4 shakes Worcestershire sauce
2 cloves of garlic, minced
1/2 teaspoon paprika
1 small onion, diced
8 oz. fresh mushrooms, sliced
12 oz bag wheat egg noodles (or any you prefer)
1/2 cup low-fat sour cream
8 oz low-fat cream cheese, softened (optional)
Directions:
In a skillet, brown meat, when nearly done add onion, mushrooms and minced garlic. Continue cooking til onions are translucent.
In the meantime, boil egg noodles according to package directions. Drain and have ready.
In a small sauce pan, whisk together SOS mix and 3 cups of water. Cook until desired thickness. You may need to adjust SOS mix to achieve desired thickness. Whisk in paprika, Worcestershire sauce, softened cream cheese (optional) and sour cream.
Mix meat mixture, cooked noodles and SOS mixture together. Spread into 9x13x2 in baking dish. Cover with foil and cook in preheated 350 degree oven for 35 to 40 minutes. Yeilds: 6 servings

~ Farm Girl
Pin It
Sunday, November 11, 2012


Subscribe to:
Posts (Atom)