Easy Freezer Meatloaf
This is your basic no frills meatloaf. Don't be discouraged from making it though. It has a good flavor and cooks up nicely to make meatloaf sandwiches with the left overs. I was very surprised myself. Thankfully, I made two for the freezer.
1 - 1/2 lbs ground beef
1 cup milk
1 tbsp Worcestershire sauce
1/4 tsp rubbed sage, or fresh chopped sage
1 tsp salt
1/2 tsp ground mustard
1/2 tsp black pepper
2 garlic cloves, minced
1 egg
1/2 cup bread crumbs or stuffing mix
1 small onion, diced
Combine all ingredients. Shape into a large loaf and place in an ungreased 9x5in baking pan. Wrap with saran wrap, then foil, date and store in freezer for up to 6 months.
Thaw over night in fridge. When you are ready to cook, preheat oven to 350 degrees. Bake uncovered for 1 hour or until meat thermometer reads 160 degrees. Let cool to room temp and serve.
** Note: I use glass ware to prepare my meatloaves in. If you do the same be sure to let the pan sit out on the counter for one hour to become room temp or they will shatter in the oven. Pin It
Showing posts with label Budget. Show all posts
Showing posts with label Budget. Show all posts
Tuesday, September 22, 2015

Sunday, April 12, 2015
Baked Italian Meatballs

Baked Italian Meatballs
1 lb hot Italian ground sausage
3/4 lb ground beef
1/4 cup parmesan cheese
1/2 cup italian bread crumbs
1 tbsp parsley flakes
1/4 cup unseasoned tomato sauce
1 tsp mustard powder
3/4 tsp dried italian seasoning
1/4 tsp salt
1/4 tsp crushed red pepper flakes
2 cloves garlic, minced
1/2 cup onion, finely chopped
Mix all ingredients.
Let cool and divide into meals, label Ziploc bag and freeze.
Makes roughly around 31 meatballs.
This is a budget meal. I got the the meats on sale. My total cost to make one batch was $8.04. One batch makes my family of 4 two meals.
Pin It
Monday, June 23, 2014
Sausage and Sauerkraut

2 large baking potatoes, peeled and quartered
1/2 pounds carrots, halved crosswise
2 tablespoons butter
Salt and Pepper
2 Tablespoons extra-virgin olive oil
2 1/2 pounds precooked link sausages, such as kielbasa or bratwurst, cut into 4 inch pieces
3 scallions, white and green portions thinly sliced separately
1 16 ounce bag sauerkraut, rinsed
2 bay leaves
mustard and sour cream, for serving (optional)
In a large saucepan, bring the potatoes and enough cold water to cover to a boil. Add carrots, lower the heat and simmer until crisp-tender, 10 minutes. Using tongs, transfer the carrots to a plate. Cook the potatoes until tender, 6 to 10 minutes more. Drain, then return the potatoes to the pot, toss with the butter and season with salt and pepper. Keep warm.
Meanwhile, in a large, deep, heavy skillet, heat 1 tablespoon olive oil over medium heat. Add the sausages and fry until browned, 6 to 8 minutes. Transfer to a platter and tent with foil.
Wipe the skillet and add the remaining 1 tablespoon olive oil; add the scallions whites and cook over medium high heat for 1 minute. Add 1 cup water, the sauerkraut, bay leaves, reserved sausages and carrots and heat through, 1 to 2 minutes. Stir in the scallion greens; discard the bay leaves.
Serve the sausages and sauerkraut with the potatoes, mustard and sour cream alongside.
Original recipe from Rachael RayPin It
Friday, December 13, 2013
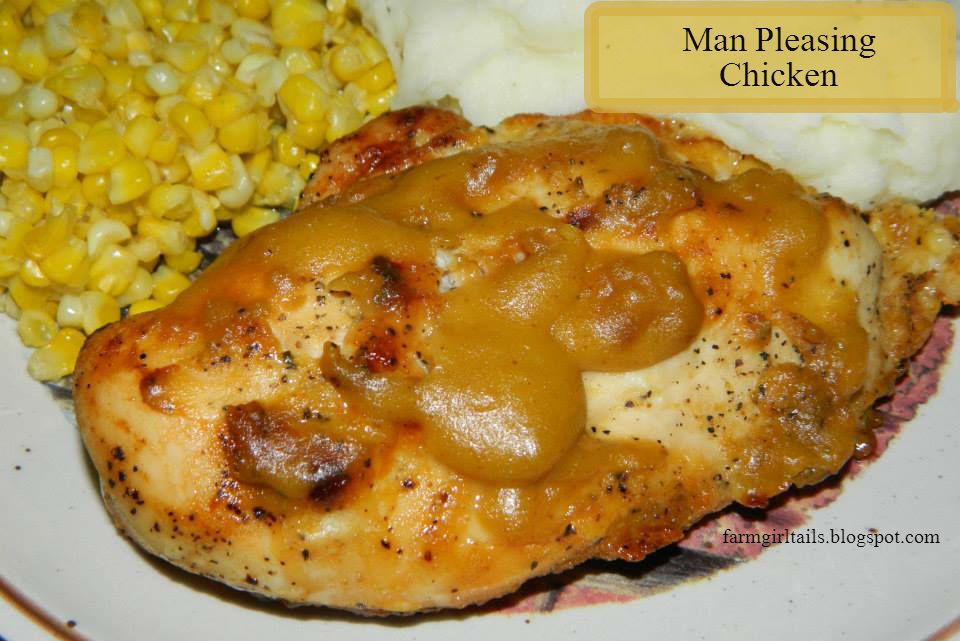
Man Pleasing Chicken
One thing I really like about face book groups is that if you join a few recipe groups you get a wide variety of recipes at your finger tips each day. Sometimes you get many people that re post the same ones. Those usually stick in my mind and I usually try them if they look pretty good. Well this one was posted from Easy Recipes, Healthy Eating.
We eat a lot of chicken and from time to time it gets pretty boring. My son and DH loves mustard so I thought I would try this one. It was simple to make which is even better on days like this. Man Pleasing Chicken is the proper name for this one. It was very good and everyone liked it at this house.
1-1/2 pound package of boneless skinless chicken breast
1/2 cup Dijon mustard
1/4 cup maple syrup
1 tablespoon rice wine vinegar
fresh rosemary
salt and pepper
Directions:
Preheat oven to 450 degrees F. Then mix together Dijon mustard, maple syrup, and rice wine vinegar.
Line a 9x13 baking dish with foil. Arrange chicken, salt and pepper chicken on both sides. Pour half of the mustard mixture over chicken, flip chicken several times to coat chicken.
Put the chicken in the oven, and let bake for 40 minutes or until meat thermometer reads 165 degrees. Baste the top of the chicken with the remaining of the mustard mixture half way through the cooking process. Use a meat thermometer to check doneness of chicken.Let chicken rest for 5 minutes before serving. Plate chicken and spoon some of the extra sauce over the chicken. Sprinkle with fresh rosemary if desired.
Original recipe from Metabolic Cookbook
Pin It
Thursday, October 3, 2013
Chili Hot Beans
I've been wanting to can some Chili Hot Beans for a while now since we eat a lot of chili during the winter. I have finally found the time and a decent recipe that works for me. I wanted to use something along the lines of "Ben's Beans" which is using dried beans without soaking them as I don't have a lot of time on my hands these days. So here's what I have came up with and it works out really great.

Chili Hot Beans
Ingredients per pint jar:
1/4 cup tomato sauce
1 teaspoon onion, diced
1 teaspoon chili powder
1 teaspoon jalpenos, diced
1/2 teaspoon salt
1/2 teaspoon cumin
1/4 teaspoon black pepper
1/4 teaspoon garlic powder
pinch of crushed red peppers
dash of hot pepper sauce (Louisiana)
1/2 cup small red beans (Pinto Beans), rinsed
In prepared sterilized jars add tomato sauce, vegetables and spices, add rinsed beans. Then add boiling water leaving 1 inch head space.


I give my jars a nice stir to keep the seasonings from clumping up. Clean rims of jars with wet paper towel: affix two piece caps. Process in pressure caner 10 lbs. for (pints) 75 minutes.
If you want to do quarts you will need to double the recipe and process at 10 lbs. pressure for 90 minutes.
Happy Canning
~ FarmgirlPin It

Chili Hot Beans
Ingredients per pint jar:
1/4 cup tomato sauce
1 teaspoon onion, diced
1 teaspoon chili powder
1 teaspoon jalpenos, diced
1/2 teaspoon salt
1/2 teaspoon cumin
1/4 teaspoon black pepper
1/4 teaspoon garlic powder
pinch of crushed red peppers
dash of hot pepper sauce (Louisiana)
1/2 cup small red beans (Pinto Beans), rinsed
In prepared sterilized jars add tomato sauce, vegetables and spices, add rinsed beans. Then add boiling water leaving 1 inch head space.


I give my jars a nice stir to keep the seasonings from clumping up. Clean rims of jars with wet paper towel: affix two piece caps. Process in pressure caner 10 lbs. for (pints) 75 minutes.
If you want to do quarts you will need to double the recipe and process at 10 lbs. pressure for 90 minutes.
Happy Canning
~ FarmgirlPin It
Friday, August 23, 2013
Slow-Cooker Balsamic Pot Roast

1/2 teaspoon salt
1/8 teaspoon black pepper
1/2 teaspoon dried thyme
1 onion, chopped
3 carrots, chopped
3 ribs celery, chopped
3 cloves garlic, chopped
2 cups unsalted beef stock
2/3 cup balsamic vinegar
Spray slow cooker bowl with non-stick cooking spray. Season roast with salt, thyme and black pepper. Place in bottom of slow cooker.
Scatter onion, carrots, celery and garlic over roast. Pour stock and balsamic vinegar over top. Cover and cook on LOW for 10 hours.
Remove roast and allow to rest 15 minutes before slicing. Skim fat off cooking liquid and thicken if desired. Serve sauce over roast.
Serves 6
Prep Time 15 minutes
Cook Time 10 hours
This recipe is a keeper for my house. I had to work late so the sauce wasn't made. It cooked a little longer (okay two whole hours longer) than recommended so it couldn't be sliced as it fell apart. I will can the broth for later use. Possibly in vegetable soup or something of the like. Two Thumbs Up!!Pin It
Friday, August 16, 2013
Home Canned Meatballs
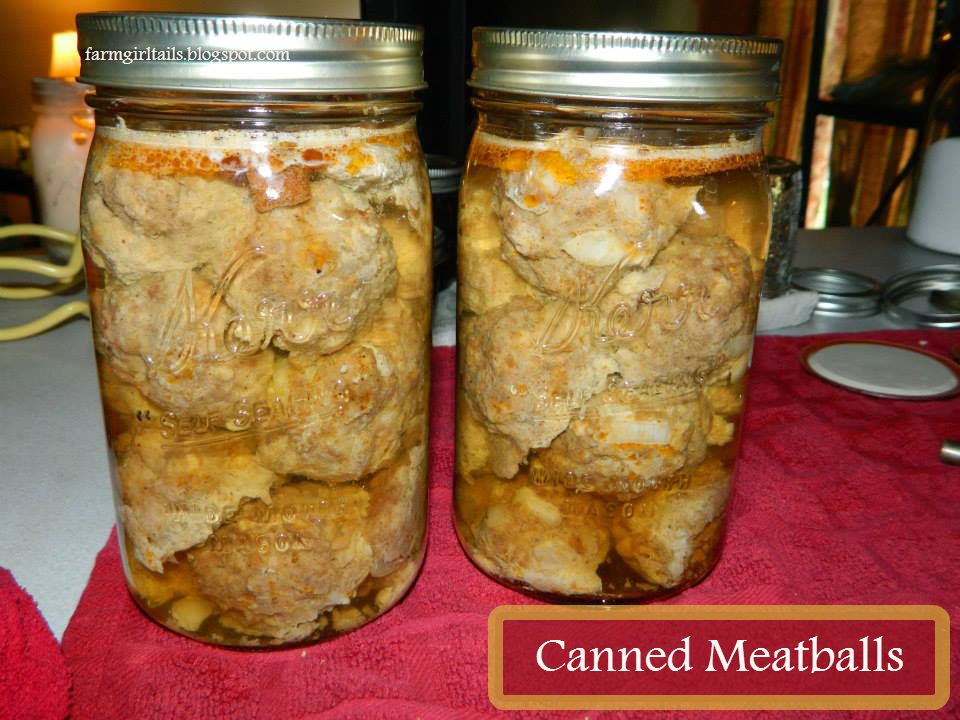 |
| Before processing |
For a while now I have been on the search for different canning recipes because of my limited time home to cook and also I prefer to have more shelf stable foods on hand with living out here in the country and the electric seems to go off all the time. I found this recipe from the Better Homes and Gardens Home Canning Cook Book dated 1973. I first had my reservations due to the ingredients but I tried it and now I'm hooked. I have added a few ingredients for my families liking. Obviously, it must only be canned in a pressure caner, and they should be packed loosely as directed. Make sure you don't get your meatballs to big either, you want them to heat through, quickly.
I have canned them in water with bouillon added. Use a size 60 scoop to make the meatballs. I use only wide mouth pint and quart jars, makes getting them in and out easily.
Basic Meatballs
6 large eggs
6 cups soft bread crumbs
1 1/2 cups water
1 cup onion, finely chopped
1 tablespoon salt
1/4 teaspoon pepper
1/4 teaspoon garlic powder (optional)
3 teaspoons Worcestershire sauce (optional)
parsley, minced (optional)
1/4 teaspoon of crushed red pepper (optional)
6 pounds ground beef
2 quarts boiling water or broth (approximate)
1/2 to 1 bouillon cube per jar
In a large bowl, combine first 11 ingredients. Add beef; mix well. Shape into 12 dozen 1-inch meatballs. (use size 60 scoop). Place on shallow baking pan. Bake at 425 degrees for 15 minutes.
Pack loosely into hot jars, leaving 1 inch head space. Add bouillon cube and boiling water or broth leaving 1 head space. Adjust lids. Process in pressure caner at 10 pounds pressure for (pints) 75 minutes and (quarts) 90 minutes.
Makes 8 pintsPin It
Friday, May 31, 2013
Shaker Pickles
One of the best sweet pickles I have ever made. Super easy and delicious. I use them on sandwiches, burgers or just a nice side condiment. They have a nice crunch when you bite into them too.
 10 medium cucumbers, sliced (maybe more depending on the size of cucumbers)
4-8 onions, sliced
Fill gallon jar with sliced cucumber and onions (depending on taste).
Mix together:
3 1/2 cups sugar
3 cups distilled white vinegar
1/3 cup pickling salt
1 teaspoon alum
1 teaspoon celery seed
1 teaspoon mustard seed
1 teaspoon turmeric
Pour mixture over cucumbers and onions, cap the jar, give it a shake, and place jar in refrigerator. Shake once a day for six days. Then pickles are ready for use. Store pickles in refrigerator, where they will keep for several months.
Although, this is not a canning recipe I am including it here because during the canning season I put up 6 or so jars for all year eating. Just make them at different stages of the canning season and you should be good to go all winter long. I label them clearly so I know how long they have been in the fridge. That is if I can keep them that long. I've been known to run out. Thanks to friends and family that snatch a jar or two during a visit.
~ Farmgirl
Pin It

4-8 onions, sliced
Fill gallon jar with sliced cucumber and onions (depending on taste).
Mix together:
3 1/2 cups sugar
3 cups distilled white vinegar
1/3 cup pickling salt
1 teaspoon alum
1 teaspoon celery seed
1 teaspoon mustard seed
1 teaspoon turmeric
Pour mixture over cucumbers and onions, cap the jar, give it a shake, and place jar in refrigerator. Shake once a day for six days. Then pickles are ready for use. Store pickles in refrigerator, where they will keep for several months.
Although, this is not a canning recipe I am including it here because during the canning season I put up 6 or so jars for all year eating. Just make them at different stages of the canning season and you should be good to go all winter long. I label them clearly so I know how long they have been in the fridge. That is if I can keep them that long. I've been known to run out. Thanks to friends and family that snatch a jar or two during a visit.
~ Farmgirl
Pin It
Sunday, May 26, 2013
Oh my my, Strawberry Pie
There's nothing like celebrating the "unofficial" first day of summer with strawberry pie. So when I saw how quick and easy this recipe was I had to try it. It was gobbled up so fast that I didn't get a serving photoed. I'm thinking I will have to make another and make it soon.

3 Tablespoons cornstarch
1 cup sugar
1 1/2 cups water
3 oz box strawberry Jell-o
2 cups sliced strawberries
Pre-baked 10" pie shell (click here for recipe)
Line bottom of pie shell with the sliced strawberries.
Combine cornstarch, sugar and water in a small saucepan. Bring to a boil and simmer, stirring constantly, until thickened (this happens really quick). Add the Jell-o and stir until dissolved. Pour over the strawberries and refrigerate until set.
Serve with whipped cream.
~ Farmgirl
Friday, May 17, 2013
General Tso's Chicken - Weight Watchers
I've always been a larger framed gal and I've always had to watch what I eat. I know there's many out there that think I cook and I don't pay attention to the calories and what not, but that's far from the truth. I have always said eat in moderation no matter what it is. But, this recipe I bring you today is one from Weight Watchers; although it don't taste like it. Believe it or not this is one of my kids favorites.

Pin It

3/4 cup canned reduced-sodium chicken broth
2 tablespoons cornstarch
2 tablespoons sugar
2 tablespoons low sodium soy sauce
1 tablespoon white wine vinegar
1/2 teaspoon ground ginger
2 teaspoons peanut oil
2 medium scallions, chopped
2 medium garlic cloves, minced
1/2 teaspoon red pepper flakes or 1 dried chili, minced
1 lb uncooked boneless skinless chicken breast, cut into 2 inch pieces
2 cups cooked white rice, kept hot
In a medium bowl, whisk together broth, cornstarch, sugar, soy sauce, vinegar and ginger; set aside.
Heat oil in a wok or large skillet over medium-high heat. Add scallions, garlic and pepper and cook 2 minutes. Add chicken and cook until browned all over, about 5 minutes.
Add reserved sauce and simmer until sauce thickens and chicken is cooked through, about 3 minutes.
Serve chicken and sauce over rice. Yields 1 cup of chicken and sauce and 1/2 cup of rice per serving = 4 points.
Happy cooking!
~ Farm Girl
Pin It
Finally Garden Time
Since the cold spell seems to have been broken and the rain has held off for the most part, I have been making the most of every dry spell to get in the garden the last few days. So here's a few pictures of the past few days.
Just so happens when I was in town getting groceries I found a new garden plant and flower store set up. So I purchased 5 flats. I sure hope they do good. They looked amazing compared to what I found at other stores that I normally got plants from.


Pin It
 |
| DH discing the garden one more time. |
Funds were super tight and I forgot to stop at the feed store so I bought some packaged Burpee seeds at Wal-Mart. Not my favorite place but they will do in a pinch.
You can barley see in this picture but there is 10 rows of established plants planted. Thanks to my friend's and my children that helped.
To show my appreciation I made dinner for everyone. Least I could do. Our friends live in town and live in an old swamp area and the only gardening they can do is container. So I told her if she would come and help and help purchase some plants that I would tend the garden. Should be enough for both of us, at least I hope so.
Cabbage and 5 rows of green beans. I still need to plant my peas and lima beans and more corn. But, we are getting there. I'm just glad to get this much done. Now to water and pray for a good garden this year.
I'm wondering how everyone else is doing with their gardening this season.
~ Farm Girl
Wednesday, May 8, 2013
Operation Duck and Chicken Run
A few days ago I bartered a few jars of jelly for two ducks. I'm staring to get a hang of this bartering as I have done it a few times here lately to get things I needed or wanted for the farm and such. We got the ducks but didn't have any place to keep them. I couldn't turn them loose because my neighbors dogs would have them for an appetizer and I'm sure my two cats would chase them around and may even harm them. So we had them cooped up in travel kennel till we could get them something more fitting.

Pin It
It's been raining here for a few days. The husband and I got up early and used the early morning hours to build a makeshift run for them from items we had already here on the farm. I found a few ideas on pintrest that would work great! I'm loving that site.
So we took the old swing set I got for FREE a few years ago. Borrowed the timbers from my blueberry bed. Purchased the netting and used some leftover rabbit wire for their door. Hubby also borrowed a tarp that wasn't being used from his parents to make them a shaded and dry area for when it starts to rain hard again. I think we have a total of $12 in the whole thing so far. I want to paint the swing set just to help protect it from more rust.
Over all we are very pleased with how it came out and I know the ducks; Quackers and Cheese are very thankful for a large area to roam in.
 |
| Quackers and Cheese in the dog kennel |
 |
| Enjoying some fresh water. |
I'll take more pictures as I get the finishing touches on the run in the next few weeks.
Have a wonderful day!!
~ Farm Girl
Thursday, May 2, 2013
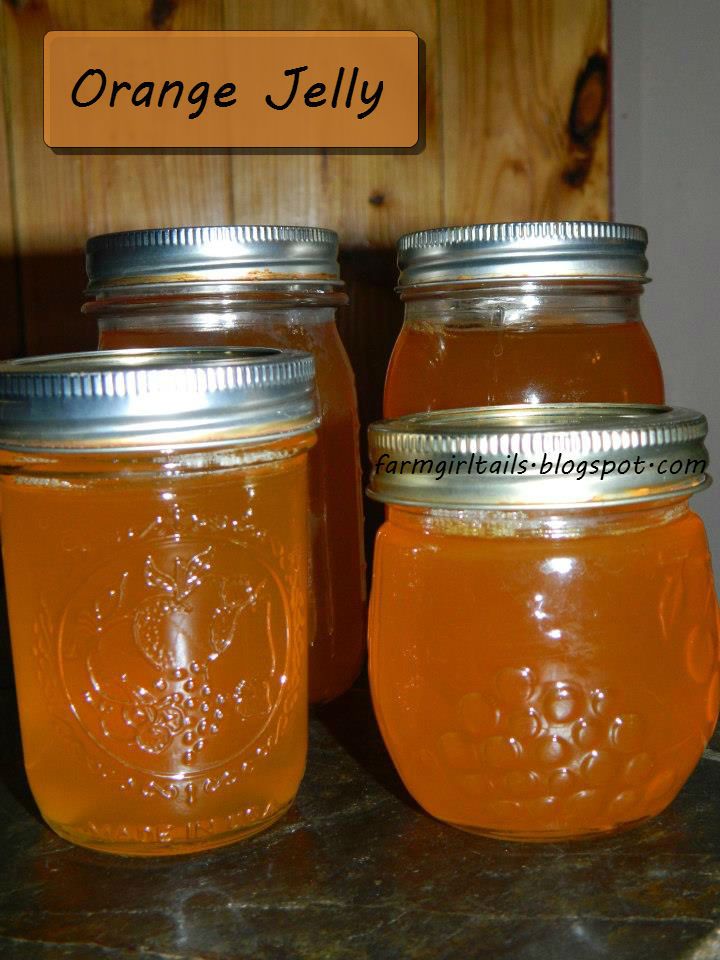
Homemade Orange Jelly
This recipe is one I found on another blog and I was thrilled to have found it. During the summer months when I'm grilling out, I use a lot of orange marmalade when making my rib sauce. I've never been a huge fan of the marmalade but loved the flavor. Now, with this orange jelly I can use it as a substitute. Which makes me one happy girl. It works out great also.
I've mainly made freezer jams since I started canning on my own. It's only been about 4 years that I've been experimenting with making different jams and jellies for the shelf. This is one that I'm happy to make every fall when the FFA citrus fruits come in. I hope that you enjoy this jelly just as much as I do.
3 1/2 cups freshly squeezed orange juice (approx. 8-10 medium to large ripe oranges)
1 box (1 3/4 oz) pectin
5 cup sugar
Juice oranges the old fashioned way with a juicer and some elbow grease. Strain the juice with a cheesecloth, paper towel or coffee filters. This step makes your jelly clearer and prettier. In my opinion.
Pour the juice into a large pot, add the pectin packet and 1/4 cup of your 5 cups of sugar. Bring to a rolling boil, then add the remaining sugar. Return to a rolling boil, stirring constantly for 1 minute. Skim off any foam. (**Note- As one of my friends pointed out to me because i forgot naturally, you can add 1/4 to 1/2 tsp butter then bring the mixture to a boil, this will reduce and sometime eliminate the foaming.)
Ladle jelly into sterilized jars. Clean rim and place sterilized lids on jars, tighten the rings over the flat lids. Process in a boiling hot water bath for 5 minutes. Remove from BWB and let sit on towel for 24 hours for the jelly to set up.
Happy Canning
~ Farm Girl
Pin It
Wednesday, May 1, 2013
Lemon Chicken
I love, love, love lemon chicken and there are so many ways to make it. But, for me I find that every time that I have a craving for lemon chicken, I either don't have any chicken thawed out or I'm running on borrowed time. This recipe here will solve everyone's dinner woo's. You'll love the moist lemony chicken dish great severed with buttered noodles or even a baked potato.

1 medium onion, chopped
4 garlic cloves, minced
1 to 3 tablespoons olive oil
4 bone-in or boneless chicken brest halves, skin removed (I prefer boneless chicken)
1 cup chicken broth
1/4 cup water
1/4 cup lemon juice
3/4 cup minced fresh parsley (2 tablespoons of dried parsley is fine also)
1/2 cup chopped celery with leaves
1-1/2 teaspoons Italian seasoning
1/2 teaspoon salt, optional
1/4 teaspoon pepper
4-1/2 teaspoons cornstarch
3 tablespoons cold water
In a pressure cooker, saute onion and garlic in oil until tender; remove with a slotted spoon and set aside.
Brown the chicken, a few pieces at a time, in the cooker. Return onion mixture and all chicken to pan. Add broth, water, lemon juice, parsley, celery, Italian seasoning, salt if desired and pepper. Close cover securely; place pressure regulator on vent pipe. (if you have a weighted gauge with lbs select 10 lbs.)
Bring cooker to full pressure over high heat. Reduce heat to medium-high and cook for 8 minutes. (Pressure regulator should maintain a slow steady rocking motion; adjust heat if needed.) Immediately cool according to manufacturer's directions until pressure is completely reduced. Remove chicken and keep warm.
Measure pan juice; return 1 1/2 cups to pan. Combine cornstarch and cold water until smooth; stir into pan juices. Bring to a boil; cook and stir for 2 minutes or until thickened. Serve over chicken.
Yeild: 4 Servings.
** Note: You can use half thawed or even frozen chicken in this recipe. You can skip the browning of the chicken. Just put all ingredients in pressure pot. Add a few extra tablespoons of lemon juice and 1/4 cup extra water and pressure cook for 20 to 25 minutes.
I hope you enjoy this Lemon Chicken just as much as my family does.
Happy Cooking!!
~ Farm Girl
* Orginal recipe from Quick Cooking July/August 2000 magazine.
Pin It
4 garlic cloves, minced
1 to 3 tablespoons olive oil
4 bone-in or boneless chicken brest halves, skin removed (I prefer boneless chicken)
1 cup chicken broth
1/4 cup water
1/4 cup lemon juice
3/4 cup minced fresh parsley (2 tablespoons of dried parsley is fine also)
1/2 cup chopped celery with leaves
1-1/2 teaspoons Italian seasoning
1/2 teaspoon salt, optional
1/4 teaspoon pepper
4-1/2 teaspoons cornstarch
3 tablespoons cold water
In a pressure cooker, saute onion and garlic in oil until tender; remove with a slotted spoon and set aside.
Brown the chicken, a few pieces at a time, in the cooker. Return onion mixture and all chicken to pan. Add broth, water, lemon juice, parsley, celery, Italian seasoning, salt if desired and pepper. Close cover securely; place pressure regulator on vent pipe. (if you have a weighted gauge with lbs select 10 lbs.)
Bring cooker to full pressure over high heat. Reduce heat to medium-high and cook for 8 minutes. (Pressure regulator should maintain a slow steady rocking motion; adjust heat if needed.) Immediately cool according to manufacturer's directions until pressure is completely reduced. Remove chicken and keep warm.
Measure pan juice; return 1 1/2 cups to pan. Combine cornstarch and cold water until smooth; stir into pan juices. Bring to a boil; cook and stir for 2 minutes or until thickened. Serve over chicken.
Yeild: 4 Servings.
** Note: You can use half thawed or even frozen chicken in this recipe. You can skip the browning of the chicken. Just put all ingredients in pressure pot. Add a few extra tablespoons of lemon juice and 1/4 cup extra water and pressure cook for 20 to 25 minutes.
I hope you enjoy this Lemon Chicken just as much as my family does.
Happy Cooking!!
~ Farm Girl
* Orginal recipe from Quick Cooking July/August 2000 magazine.
You will need to use one of these for this recipe: Pressure Cooker
Pin It
Sunday, April 28, 2013
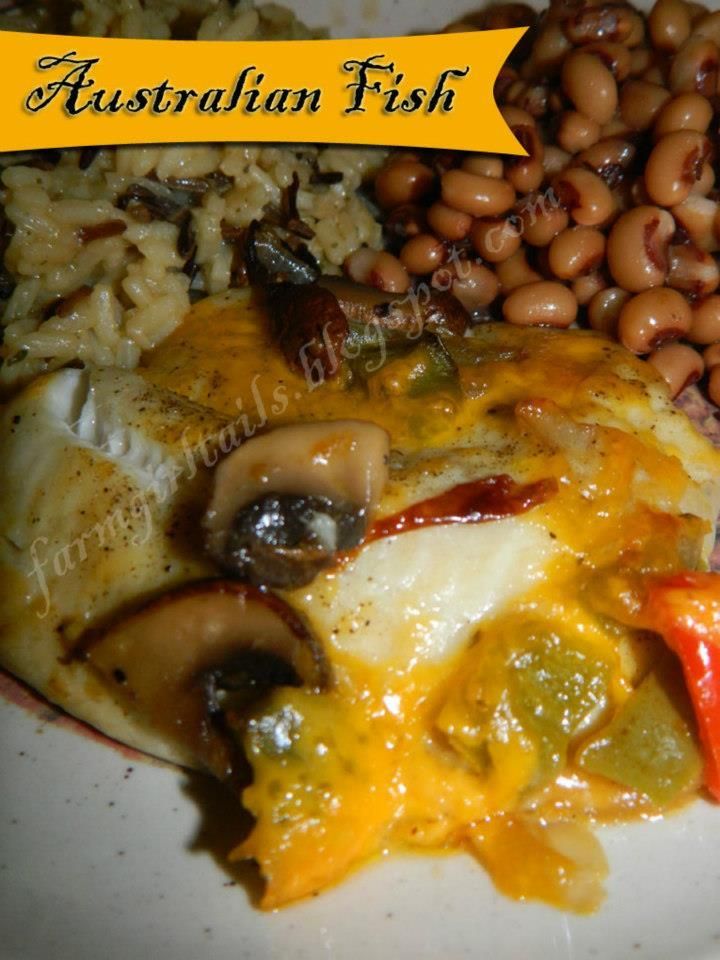
Australian Fish
Recipe:
1/2 pound fresh mushrooms2 tablespoons butter
1 tablespoon oil
1/2 cup cheddar cheese, shredded
1 1/2 pounds tilapia fillets (or any white fish)
1/4 teaspoon salt
1/4 teaspoon pepper
4 tablespoons green peppers, chopped
6 tablespoons white wine
2 tablespoons lemon juice, fresh
1 tablespoon parsley, chopped
Melt butter in skillet over low heat. Add mushrooms, bell peppers and onion and saute over medium heat until tender.
Rub oil over shallow 4 quarts baking dish and sprinkle with half of the grated cheese.
Place fish on cheese.
Sprinkle fish with salt and pepper. Add sauteed vegetables and sprinkle with remaining cheese. Pour wine over fillets.
Bake at 450 degrees for 20 minutes or until fish flakes.
Sprinkle with lemon juice and parsley.
Enjoy!!
~ Farm Girl
Org. recipe can be found at Kymmarie on Food.com
Saturday, April 27, 2013
Operation Pig Pen
Day One:
 |
| BEFORE picture. At least 120 year old barn crumbling. |
 |
| After picture. |
We couldn't clean up the whole building as behind it is pasture and is holding in one bull that will be going to the butcher shop soon. The building is acting as a fence. Sometime next week we will have to build new fence so that we can remove the rest for more expansion.
We had to move all the debris from the barn across the creek and to our burn pile. It don't seem like much but, really it was. I know I had a good chunk of it all cleaned up before my son and husband made it back from Farmer Bob's.
 |
| This will be burned. Hopefully very soon. |
 |
| Drilling post holes |
 |
| Measuring for the next hole |
 |
| All posts set |
 |
| Saw mill lumber from the farm. At least 24 years old. |
 |
| Add the side boards. |
 |
| Added bedding area |
 |
| Getting the roof done |
 |
| This scared the ba jibbies out of me. But, boys will be boys. I think they were having a good time, anyhow. |
 |
| Last thing few nails before we called it a night. Not much more light to work in. |
Day Two:
Moved along pretty fast as much of the work was done. We only had to finish putting up the walls and make the door. On this day it was only our Daughter, Myself and Daddy working. Our son has a job at the local stock market with his buddy and they had to go to work.
We spent the first part of the morning going to the stock market to pick up the piggies. This was our meeting place of choice, plus we had some paper work to do.
 |
| Piggies in the stock trailer. Ready to go to their new home. |
 |
| Now that's a door! |
 |
| Completed hut! |
 |
| Sissy helping out too! |
 |
| Completed Pig Pen |
This whole pen cost us roughly around 25 dollars. When pulling the old barn down we found some door hinges from the old barn. Our only expense was the gas to run the chainsaw, diesel to run the tractor to drill holes and retrieve the fallen locust tree, and the two partial boxes of nails. Everything else came off the farm.
This pig pen was probably an over kill but we shouldn't have to replace it anytime soon.
We took a page right out of Eustace Conway book. If you don't know who I'm talking about he is a naturalist. Living on Turtle Island Preserve in North Carolina. He's fighting hard to keep his land and to build and live as natural as possible. I first heard about him on television on a show called Mountain Men on the History Channel. Very, very interesting man.
But, back to what my real story is about.
 |
| Meet Forest on the left and Bubba on the right. |
One last photo of the happy piggies.

I learned a lot during my time out there with my husband and children. WE all worked together to complete a project that will give us many years of use.
Have a great rest of the weekend my friends.
~ Farm Girl
Thursday, April 25, 2013
Dill Pickle Meatloaf
I've been making this meatloaf for a long while now. Every time that I make it there is nothing left in the pan and sometimes a fight will break out for the last little bits in the pan. I need to start doubling this recipe so this behavior stops! Ah but then again its quite a funny sight!! Hope that some of you all try this. Everyone that I have shared this recipe with has totally enjoyed it.
1 1/2 pounds of ground beef
1 medium onion, chopped
1/2 cup soft breadcrumbs
1/2 cup pickle juice
1 large egg
1/2 teaspoon salt
1/2 teaspoon black pepper
1/2 cup dill pickles, chopped
1/2 cup ketchup
1/4 cup water
2 tablespoons brown sugar
1 teaspoon Worcestershire sauce
Preheat oven to 350 degrees.
Lightly mix meat with onions, bread crumbs, pickles, egg salt, and pepper until well blended.
Shape into a loaf and place in a shallow pan.

Combine pickle juice, ketchup, water, brown sugar and Worcestershire sauce. (I usually leave out the water and just put in extra pickle juice. We like the pickle flavoring.)
Pour over meatloaf and place in 350 degree oven basting twice with sauce in pan for 40 minutes.
Continue baking without basting for an additional 30-35 minutes, or until meatloaf is really glazed and done.
Garnish with a pickle fan, if desired.
Enjoy
~Farm Girl
Pin It
 |
| Family favorite! This will get the kids to clean their plates. |
1 1/2 pounds of ground beef
1 medium onion, chopped
1/2 cup soft breadcrumbs
1/2 cup pickle juice
1 large egg
1/2 teaspoon salt
1/2 teaspoon black pepper
1/2 cup dill pickles, chopped
1/2 cup ketchup
1/4 cup water
2 tablespoons brown sugar
1 teaspoon Worcestershire sauce
Preheat oven to 350 degrees.
Lightly mix meat with onions, bread crumbs, pickles, egg salt, and pepper until well blended.
Shape into a loaf and place in a shallow pan.
Combine pickle juice, ketchup, water, brown sugar and Worcestershire sauce. (I usually leave out the water and just put in extra pickle juice. We like the pickle flavoring.)
Pour over meatloaf and place in 350 degree oven basting twice with sauce in pan for 40 minutes.
Continue baking without basting for an additional 30-35 minutes, or until meatloaf is really glazed and done.
Garnish with a pickle fan, if desired.
Enjoy
~Farm Girl
Thursday, April 18, 2013
The Wide World of Canning
I belong to several canning groups on Facebook and other places. Lately, I have seen items being canned that just blow my mind. Like meatloaf, meatballs, sweet and sour chicken, ham and so on. Now I'm all for convenience and quick meals. I'm finding myself drawn to these things as easy meals for not only my family but things for my husband to take to work in his lunch pail that will take very little effort.
Thankfully, the art canning allows us the opportunity to know exactly what is in our foods. Unlike the quick meals in the stores. I know they are labeled at the stores but really what is some of that stuff we can't pronounce?
So anyhow, I grew up knowing the canning world as my mother and grandmothers have always done it for as long as I can remember. Now that I have been canning for 7 years on my own, many of the things I can is much different from the stuff that they canned. I remember many, many days cleaning potatoes, tomatoes and green beans for the both of them.
I'm so thankful for the Internet and the canning groups that have opened my eyes to the many different recipes and wealth of knowledge that has been provided for me to make such wonderful things. Just so you know I have yet to try the meatloaf, meatballs, and sweet and sour chicken and many other things. But, I'm slowly getting up the nerve to try them.
I now have over 2000 jars so I'm ready to spread my wings and try something new.
What are some of the things you have tried lately that you have thought long and hard about if it was worth the risk?
~ Farm Girl
Pin It
Thankfully, the art canning allows us the opportunity to know exactly what is in our foods. Unlike the quick meals in the stores. I know they are labeled at the stores but really what is some of that stuff we can't pronounce?
So anyhow, I grew up knowing the canning world as my mother and grandmothers have always done it for as long as I can remember. Now that I have been canning for 7 years on my own, many of the things I can is much different from the stuff that they canned. I remember many, many days cleaning potatoes, tomatoes and green beans for the both of them.
I'm so thankful for the Internet and the canning groups that have opened my eyes to the many different recipes and wealth of knowledge that has been provided for me to make such wonderful things. Just so you know I have yet to try the meatloaf, meatballs, and sweet and sour chicken and many other things. But, I'm slowly getting up the nerve to try them.
I now have over 2000 jars so I'm ready to spread my wings and try something new.
What are some of the things you have tried lately that you have thought long and hard about if it was worth the risk?
~ Farm Girl
Pin It
Wednesday, March 20, 2013
Strawberry Cream Cheese Cobbler

Strawberry Cream Cheese Cobbler
1 stick (1/2 cup) butter
1 egg, lightly scrambled
1 cup milk
1 cup all purpose flour
1 cup sugar
2 teaspoons baking powder
1/2 teaspoon salt
2 quarts whole strawberries, capped and washed
4 ounces Neufchatel cheese, cut into small pieces
Plain Greek yogurt, vanilla ice cream or whipped topping for serving optional
Preheat oven to 350 degrees. Melt butter and pour into 9x13 inch glass baking dish. In a small bowl, mix together the egg, flour, sugar, baking powder and salt. Pour directly over the butter in the baking dish, but do not stir.
Add the strawberries arranging in a single layer as much as possible. Sprinkle cream cheese pieces over strawberries. Place in preheated oven and bake for 45 minutes, or until top is golden brown and edges are bubbling. (Crust rises up and around the fruit, but fruit will still peek out of top.)
Serve hot out of the oven with choice of topping, if desired.
Note: The berries will sink and become mushy the longer it sits out of the oven after baking. Best if eaten hot fresh out of the oven.

Recipe credit goes to Kitchenscoop.com
You may be interested in these:
Loaded Potato & Buffalo Chicken Casserole
Loaded Potato & Buffalo Chicken Casserole

Pin It
2 pounds boneless chicken breasts, cubed 1 inch (I use chicken tenderloins)
8 to 10 medium potatoes, cut in 1/2 inch cubes
1/3 cup olive oil
1- 1/2 teaspoons salt
1 tablespoon black pepper
1 tablespoon paprika
2 tablespoons garlic powder
6 tablespoons hot sauce
Topping:
2 cups fiesta blend cheese
1 cup crumbled bacon
1 cup diced green onion
Preheat oven to 500 degrees.
Spray a 9x13x2 inch backing dish with cooking spray.
In a large bowl mix together the olive oil, salt, pepper, paprika, garlic powder and hot sauce. Add the cubed potatoes and stir to coat. Carefully scoop the potatoes into the prepared baking dish, leaving behind as much of the olive oil/hot sauce mixture as possible. Bake the potatoes for 45-50 minutes, stirring every 10-15 minutes, until cooked through and crispy and browned on the outside.
While the potatoes are cooking, add the cubed chicken to the bowl with the leftover olive oil/hot sauce mixture and stir to coat. Once the potatoes are fully cooked, remove from the oven and lower the oven temperature to 400 degrees. Top the potatoes with the raw marinated chicken. Top with cheese, bacon and chives.
Return the casserole to the oven and bake for 15-20 minutes or until chicken is cooked through and topping is bubbly.
Serve with extra hot sauce and/or ranch dressing.
Note: I don't find this spicy at all. If you want some kick add your favorite powdered buffalo seasoning or some ground cayenne pepper to the seasoning mix.
Recipe from Food.com~Internetnut
Pin It
Subscribe to:
Posts (Atom)